Today’s Translucent Florals Congratulations card offers cheerful greetings to the recipient with its sophisticated and tailored look and versatile design that is further enhanced by 2 simple techniques.
Enjoy creating!
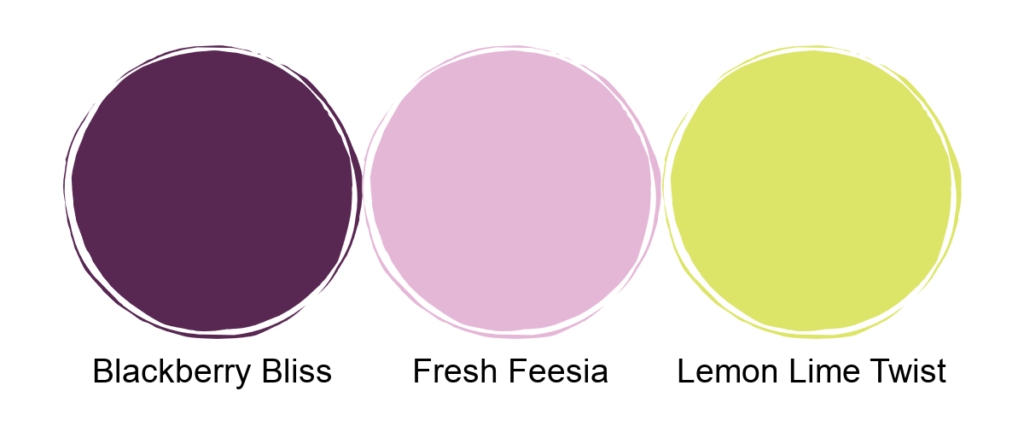
The color palette for this card give it a warm, sophisticated, and tailored feeling.
This simple layout is simple. It is enhanced by two simple techniques, dry embossing and blending. If you are a beginning stamper, the die cut elements are easy to cut by hand and the dry embossing can be skipped if you don’t have the die cut/embossing machine. Don’t worry the card will still look fabulous.
PREP THE CARD
Cut all pieces according to measurements
Cut a piece of Basic White Herring Bone Ribbon 4 1/2″ long and color it with the Black Berry Bliss Stampin’ Blends. Set aside to dry.
Stamp the following from the Translucent Florals Stamp Set on Basic White Scrap: ~ 1 full flower in Blackberry Bliss ~ 1 full flower in Fresh Freesia ~ 1 double leaf and 1 single leaf
Stamp the exterior sentiment, from the Phrases for all stamp set, in Blackberry Bliss on Basic White Scrap.
On one of the Basic White mats, stamp from the following from the Translucent Florals Stamp Set: ~ Interior sentiment in Blackberry Bliss ~ 1 full flower in the lower left corner in Fresh Freesia ~ 2 leaves at the base of the flower in Lemon Lime Twist
Die cut and emboss the following: ~ Position & secure the coordinating Translucent Florals dies to images on Basic White scrap (1 Blackberry Bliss flower, 1 Fresh Freesia Flower, 1 single leaf, 1 double leaf.) ~ Run all through the SCEM.
Position and secure the thin label die from the Something Fancy Dies around the exterior sentiment and run through SCEM.
Insert the remaining Basic White mat into the Quatrafoil Tile Embossing Folder and run through SCEM. (Skip to step 9 if you don’t have a die cut/embossing machine.)
Lightly blend Fresh Freesia ink over the embossed mat varying the color depth giving it a modeled or distressed look.
ASSEMBLE CARD
Adhere the interior mat to the inside of the card.
Adhere the Fresh Freesia blended embossed mat to the Fresh Freesia mat.
Flip compiled mat over and add 1 1/2″ piece of Tear & Tape to both sides of the mat, with the top of the tape placed around 2 3/4″ from the bottom of the compiled mat.
Wrap the colored ribbon around the front of the mat and adhere to Tear & Tape on the back.
Add glue to the center of the Blackberry Bliss flower, so leaves are able to be tucked in later, and adhere it to the compiled mat, slightly tilting the flower to the right. Majority of the flower should be over the top of the ribbon and a small portion hanging over the bottom. (See photo for placement.)
Dry fit the the Fresh Freesia flower with the left edge of the sentiment tucked partially underneath. The sentiment should be centered vertically on the ribbon.(See photo for clarification.) When satisfied, carefully remove the flower leaving the sentiment in place, add a Glue Dot to the back of the flower, put it back in place, and secure the sentiment to it.
Remove and add Stampin’ Dimensionals to the back of the combined focal image and then adhere to card front.
Adhere compiled mat to the Blackberry Bliss card base.
Embellish with 3 Flat Adhesive-Backed Pearls. 1 large in the center of the Fresh Freesia flower and 2 in the upper right corner on the embossed mat.
Don’t forget to decorate the envelope!
The fun of receiving snail mail begins with the envelope.
I finished the envelope by stamping a flower in the front, lower left corner and stamping leaves on the envelope flap. Quick and easy!
Other ways to decorate an envelope include:
Dry emboss the envelope flap.
Stamped the envelope flap, along the left edge, or across the bottom.
Adhere coordinating DSP along the front left edge and/or across the bottom.
Die Cut a label out of DSP large enough to adhere a mailing label of the addressee on it and still see the design of the DSP peaking out around the edges of the mailing label.
Calypso Coral 3 1/4″ x 5 1/4″ 3 1/2″ x 2 1/2″ 4″ x 5 1/4″
Basic White 3 3/4″ x 5″
Inked Botanicals DSP #1 2 1/4″ x 4 3/4″ 3 1/4″ x 2″ 3/4″ x 4″ 6″ x 2 1/4″
Inked Botanicals DSP #2 Scrap
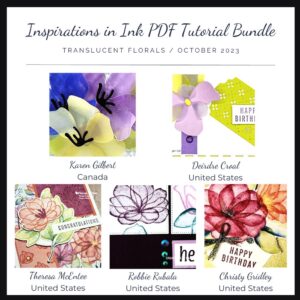
OCTOBER'S FREE TUTORIAL
Place a $50 order with me by Tuesday, October 31st and receive this month’s Inspirations In Ink Tutorial containing 5 project using the Translucent Florals Bundle, all designed by talented Stampin’ Up! Demonstrators world-wide.
-PLUS-
Receive one of my customer Thank you cards with a PDF so you can create it yourself.
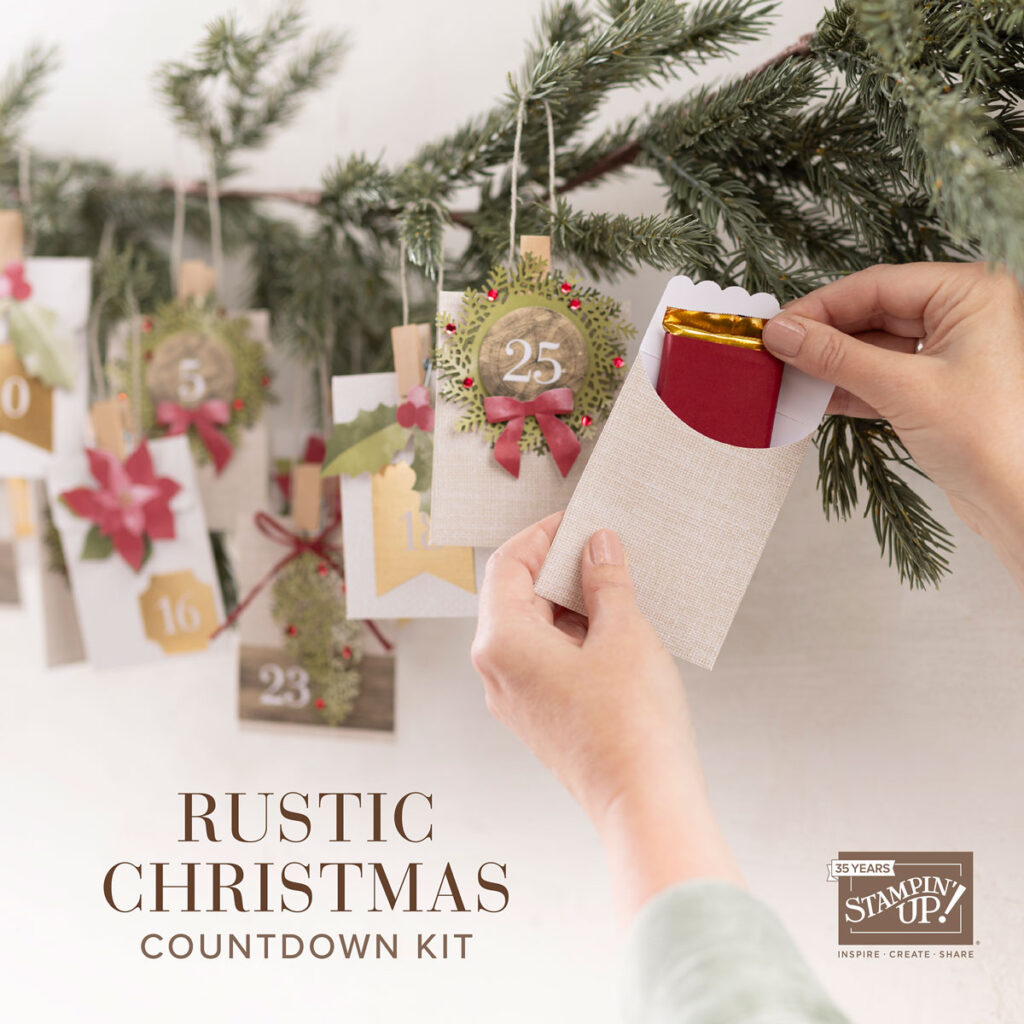
This month’s kit comes with everything you need to make traditional Christmas treat packaging boxes that you can fill with all sorts of small goodies, treats, gifts, and more.
Plus,
It coordinates with the October Home for the Holidays Paper Pumpkin Kit! It is only available while supplies last.
Tis the season to start your holiday crafting! It’s so simple with this all-inclusive kit. Adhere the die cuts and embellishments, then tie the tag to a gift with a twine bow. You’ll have handmade tags in minutes!
This is a great kit for kids! Let them create their own Advent Calendar and enjoy their faces as they open their daily envelope.


")
")


 Herringbone Ribbon")


