This card is built vertically. (Fold at top.)
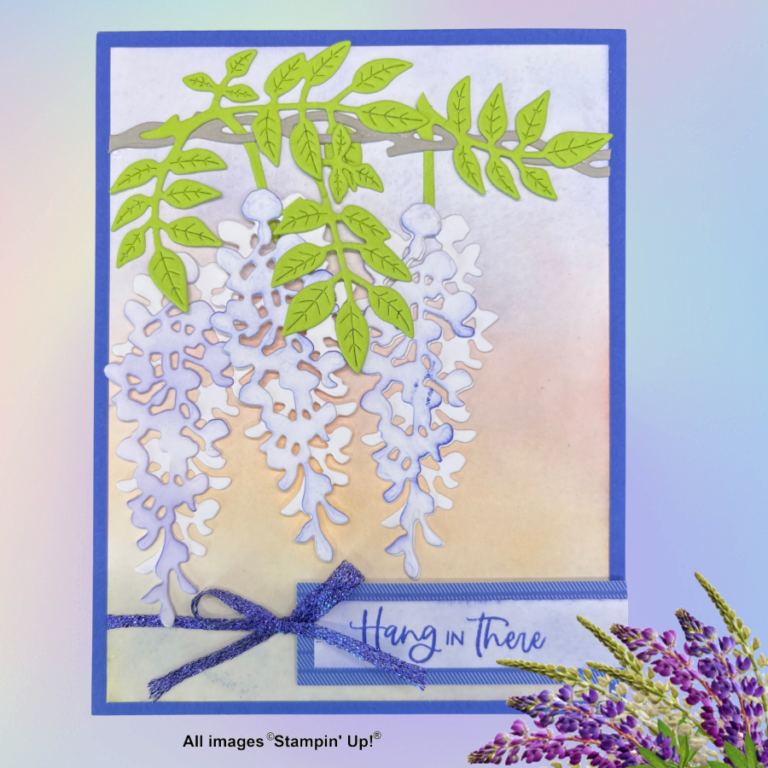
Use photo above for reference any time you have questions about dies used or placement of stamping or die cuts.
1. Cut card base and mats as listed in the Materials & Measurements Section.
2. Secure the Wisteria Dies to the Basic White card stock, Branch Die to the Parakeet Party card stock, and the Vine Die to the Sahara Sand card stock. Run Through SCEM. Repeat the process for the Wisteria Dies 2 more times and the Branch Die 1 more time.
3. Stamp the exterior sentiment on the small label and interior sentiments on the interior mat.
4. Blend your background on the exterior Basic White card stock mat. Color order from bottom to top: Daffodil Delight, Pale Papaya, Calypso Coral. To blend your background, rub a clean blending brush on the daffodil Delight ink pad. Next, starting off the page with light pressure, add color to mat by gently rubbing brush over the paper working from one edge of paper to the other and ¼ of the way up. With a new blending brush, repeat this process with the rest of the. Be sure to blend the edges of color together, so there is a smooth transition between them. (Remember, ink blending is about building color, so start light and add more until you are satisfied with the color.)
5. Add a bit of color to the stamped label by blending on a very light layer of Orchid Oasis ink.
6. Blend color onto the 3 bulkier/top Wisteria flower using Orchid Oasis ink. Using 1 top and 1 bottom (more delicate) Wisteria flower, line up the top and bottom tips, and align the edges so you can see the white flowers from behind.
7. Take the 1st branch and cut the leaf to the right of the hanging stem apart from the stem. Then weave the left end of the branch through the hole at the left end of the vine and the hanging stem through another hole. (Be sure you slip the leaf you separated from the vine over the vine, or the stem will not fit.) Arrange the branch making sure the upper leaves fit on the blended mat and the vine can still be seen. Secure to the vine, so branch stays in place, but you are able to fit other branches under it.
8. Using the 2nd branch, snip the branch apart to the left of the hanging stem. Weave the stem through vine hole making sure the cut end of the branch is hidden by the leaves of the 1st branch and fits within the Basic White mat. Secure. Set remaining leaf group aside for later.
9. Adhere the vine/branches combination to the Blended mat placing adhesive along the vine only.
10. Adhere the left Wisteria flower directly to the mat with the left bunch of leaves hanging over the end of the flower serving as the stem. Next, adhere the right Wisteria flower to the stem on the right. Place dimensionals on the remaining Wisteria flower and adhere to middle stem, slightly overlapping the other two flowers.
11. Tuck the remaining leaf under the vine hanging down between the middle and right flower and adhere.
12. Wrap Orchid Oasis Metallic Weave Ribbon about ½” up from the bottom of the blended mat. Adhere the label to the matching Orchid Oasis mat. Place dimensionals on the back and adhere equal to the edge of the card base. Tie and adhere a bow to the left of the label.
13. Blend a little bit of color to the right edge of the interior mat and adhere inside the card.
")


 Cardstock")


 Woven Metallic Ribbon")


