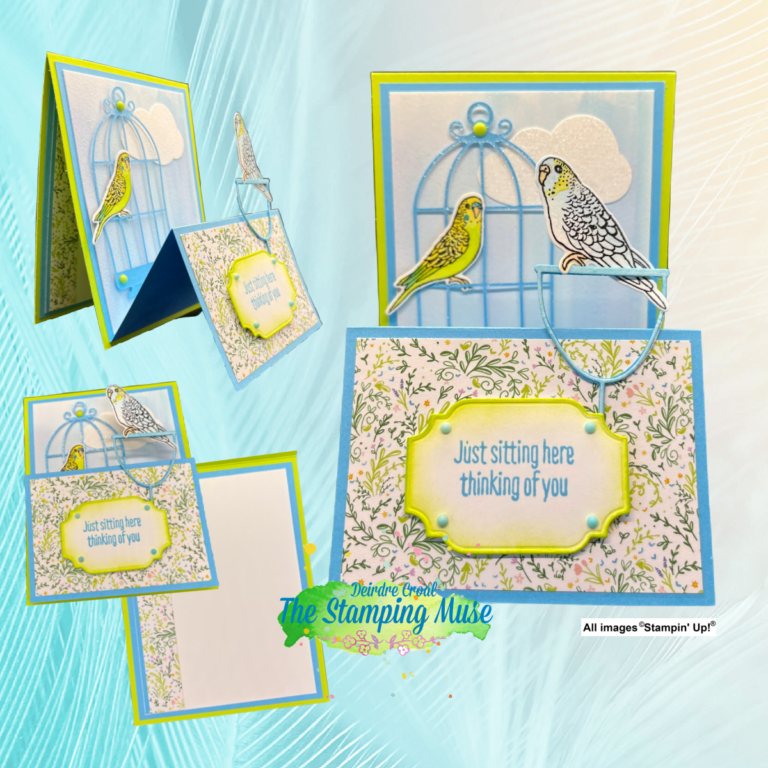
This card is built vertically. (Fold at top.)
Use photo above for reference any time you have questions about dies used or placement of stamping or die cuts.
1. Cut card bases and mats as listed in the Materials & Measurements Section. Punch out 1 cloud.
2. Stamp two birds, 1 facing left and 1 facing right, in StazOn Jet Black Ink on Fluid 100 Watercolor Paper. On Basic White or Fluid 100 scrap stamp your sentiment.
3. Create the watercolor background: Begin by making a palette with ink for water coloring. (Read about how to create a pallet below.) Mist a piece of Fluid 100 Watercolor Paper. Add drops of water to your Tahitian Tide ink with the water painter, pick up some color, and brush a light coat on the paper. Start light and add more color as needed. If too dark, add more water to dilute the color. Repeat the process by adding Orchid Oasis to add some highlights.
Next watercolor the two birds.
Create a watercolor pallet by. . .
Option 1: Set a corner of a clean block on an ink pad to pick up color. With this option you may need to use a clean block for every color, so the inks don’t accidentally cross contaminate ink pads of another color when picking up more ink.
Option 2: Place a drop of re-inker on a clean block. This is the easiest because you can use 1 large block and easily add more ink if you need it.
4. Using the Birdhouse Dies, secure the matching dies to the birds. Secure the large birdhouse and perch dies to Tahitian Tide scrap. Using the All That Dies, center the stamped sentiment with the notched rectangle die and secure. Run all through the SCEM. Repeat this process 3 or 4 times with the perch. The perch is extremely flimsy with just one layer. Gluing multiple layers together will strengthen the perch preventing it from flopping over when displayed.
5. Using the Tahitian Tide card base, fold the score mark at 2 7/8” in a mountain fold and the score mark at 5 ¾” in a valley fold. Mat the small front panel with the Tea Boutique DSP. Mat the large panel with the Water colored background.
6. Wink of Stella both the clouds and the large bird cage. Then adhere the cloud in the upper right corner. Add 1 dimensionals to the top of the bird cage and multiple dimensionals along the bottom of the birdcage. Adhere along the left edge near the top. Dry fit the right facing bird near the left edge on the lower bar of the bird cage. Add dimensionals to the back of the bird in spots where they will make contact the water-colored mat, not the bird cage bars, and adhere to card base.
7. Glue together all of the perch die cuts. Then attach the left facing bird to the perch by placing a small dot of glue on the back of the upper talon and on the front of the lower talon. Slip the talons over the perch with the upper talon in front of the perch and the lower talon behind the perch. Place a dot of glue on the back of the tail. Push it forward through the perch and adhere it to the perch. Adhere the perch to the small front panel as shown in above photo.
8. Using Parakeet Party ink, gently blend to color over the edges of the label making sure to leave the center white. Place dimensionals on the back of the label and center on the small front panel over the post of the perch.
9. Embellish! Using the 2022-2024 Matte Decorative Dots, add 4 small Tahitian Tide dots to the 4 corners of the label and 1 large Parakeet Party dot to the top of the bird cage.

")


 Cardstock")


