Welcome to the August 2023 Inspirations In Ink Blog Hop. Thank you for visiting my page. The Inspirations In Ink team is a group of Stampin’ Up! Demonstrators world-wide who have banned together to provide you with inspiration for creating handmade cards.
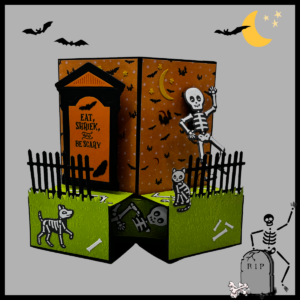
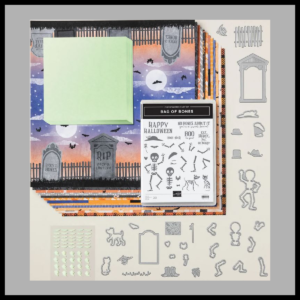
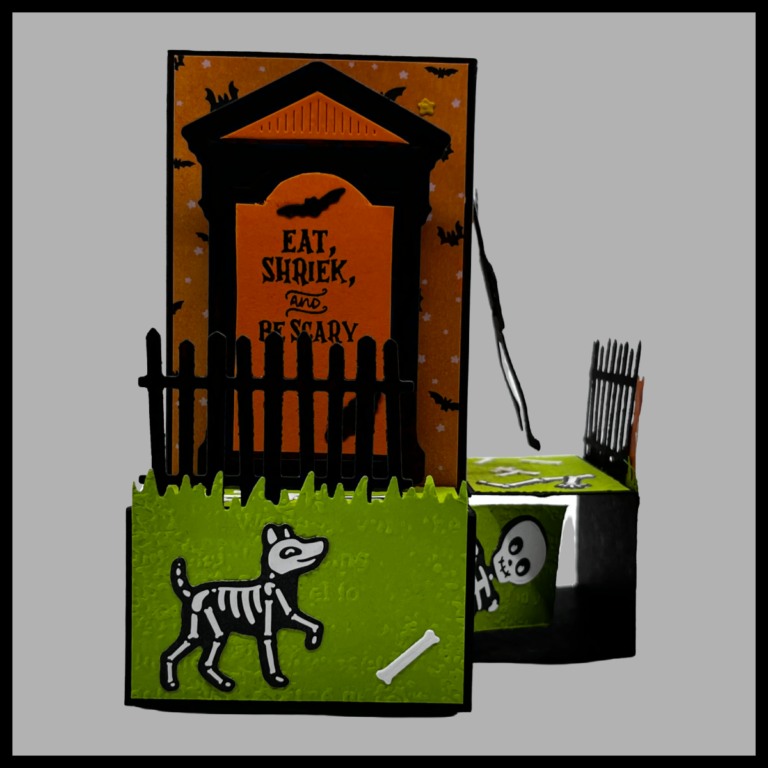
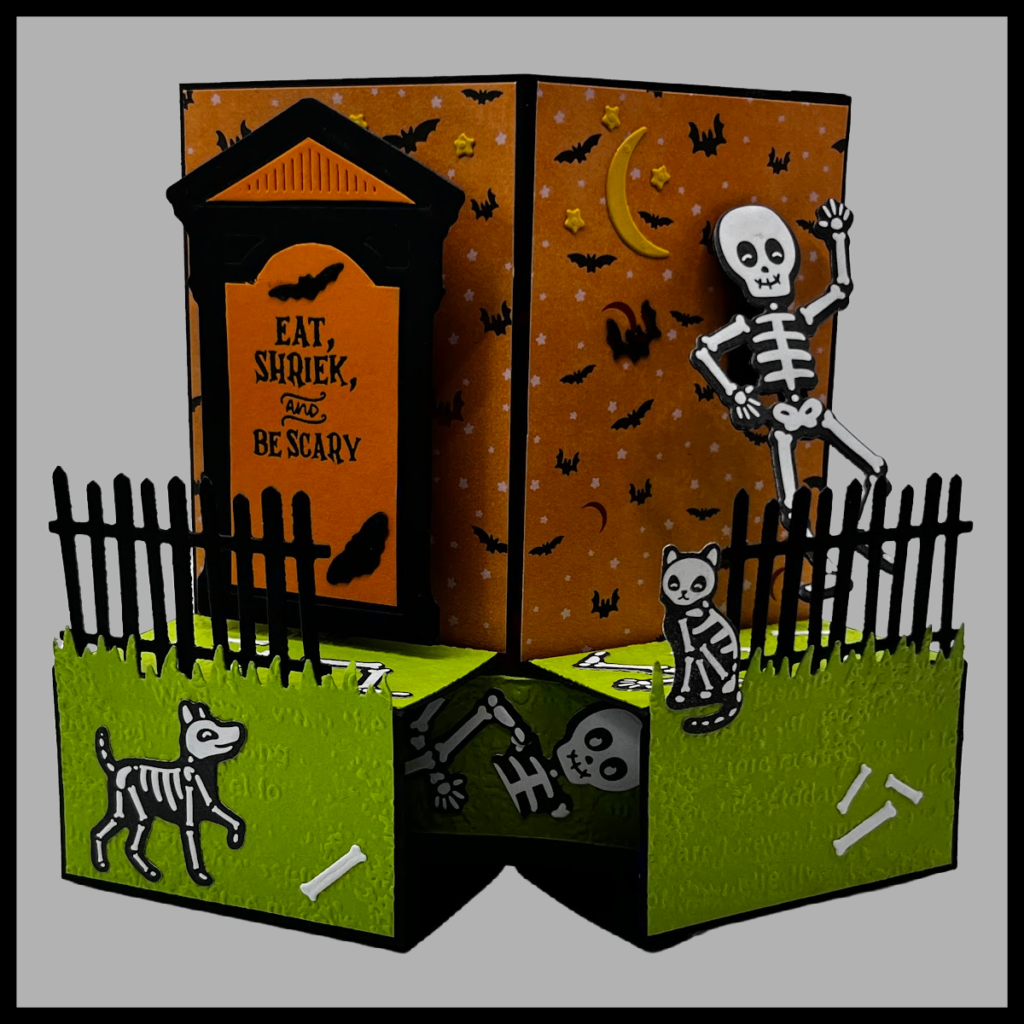
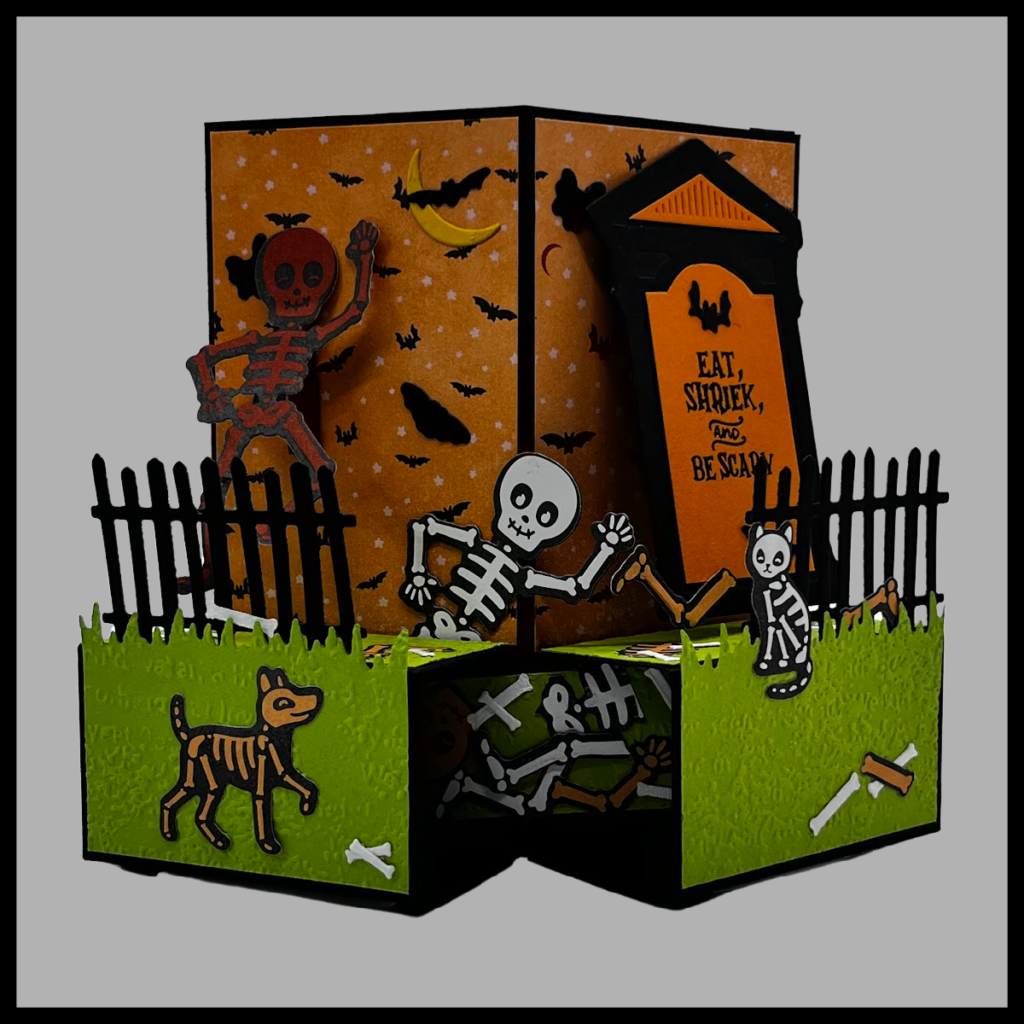
Today’s Hop is featuring Fun Fold card creations. The Fun Fold I chose to create is a Triple Cube Card featuring the Them Bones Suite (Bag of Bones Bundle).
Although this card looks complicated, I promise it is not, so give it a try.
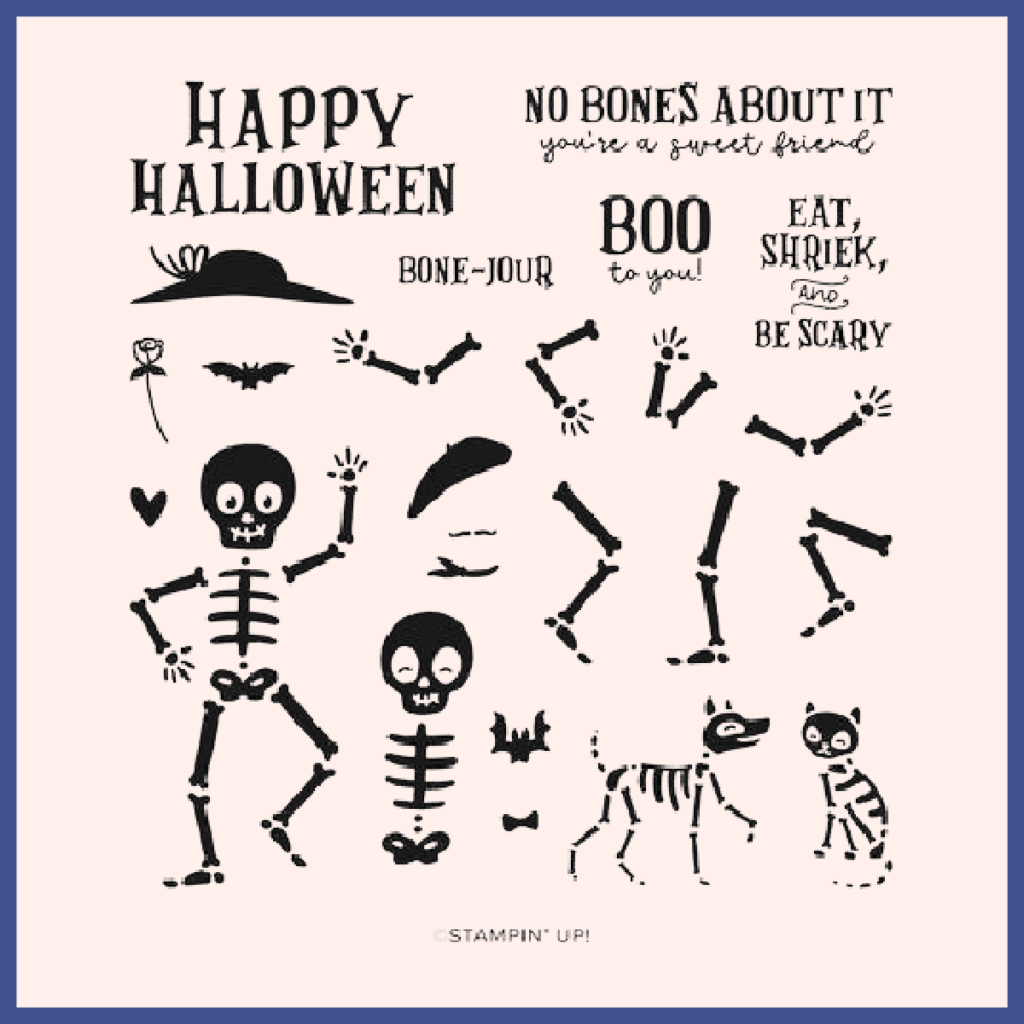
The Them Bone Suite is a darling Suite for those that love Halloween or have young ones that they like to send animated cards to. I am not a Halloween lover, but when my nieces & nephews began heading off to college I began sending Halloween cards with a little treat ($) inside.
This Suite includes:
BAG OF BONES STAMPS
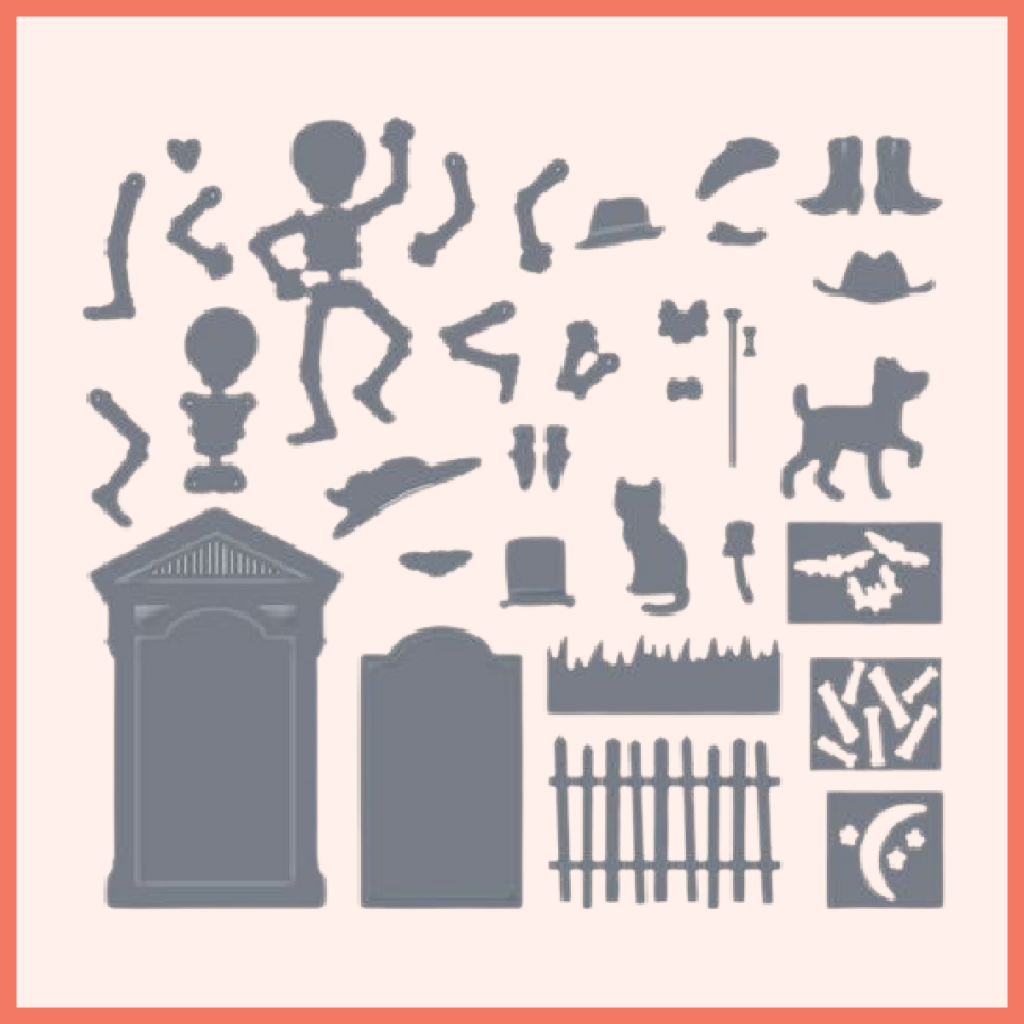
BAG OF BONES DIES
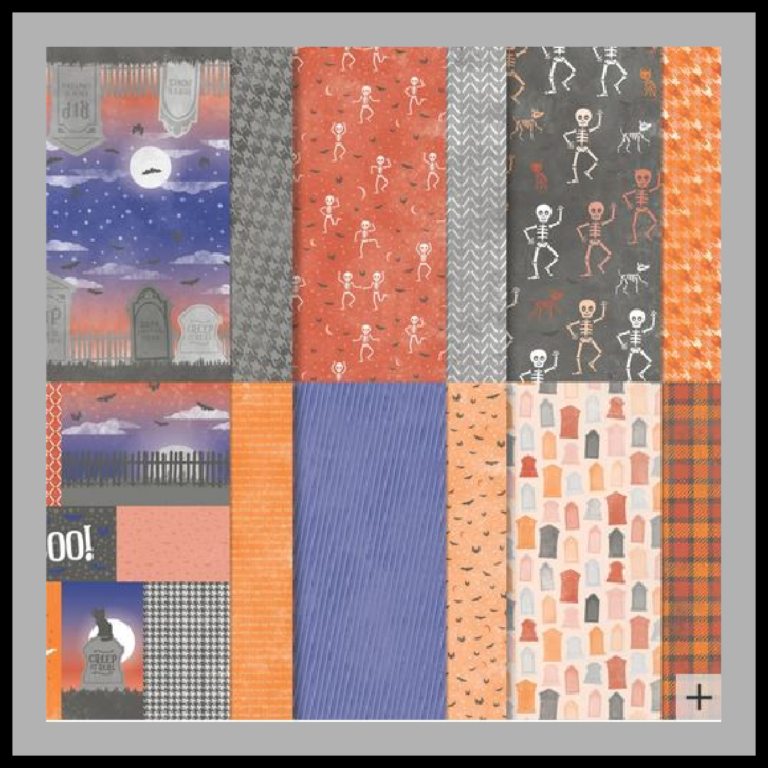
THEM BONES DSP
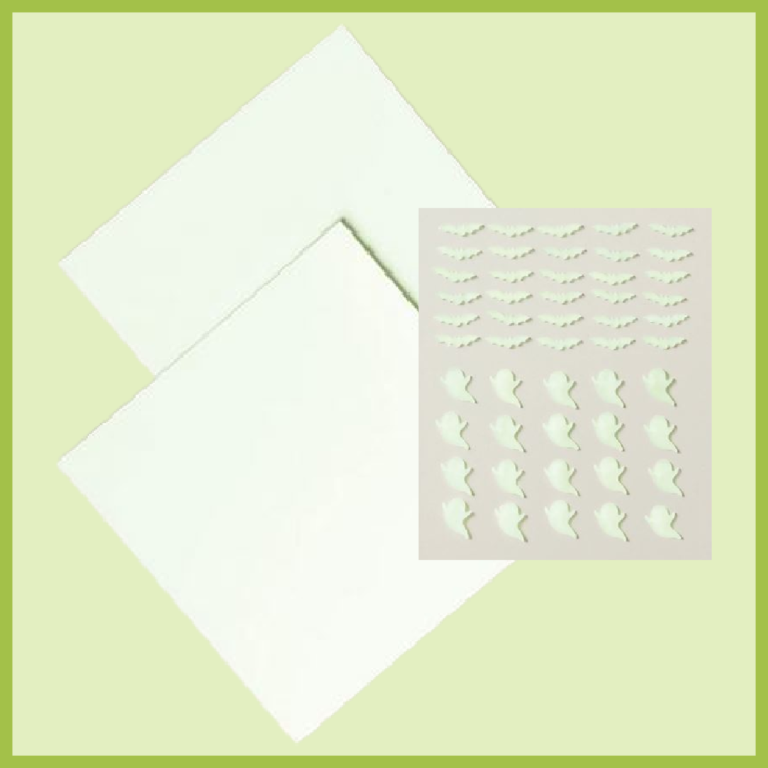
GLOW-IN-THE-DARK
Specialty Paper – Bats & Ghosts Embellishments
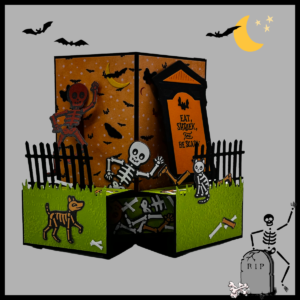
I wanted to create a multi-dimensional scene with this Suite and decided that the Triple Cube Fun Fold would do an amazing job. The color palette for my card includes: Basic Black for the cube bases, Tombstone, Fences, and bats; Pumpkin Pie for tombstone detail; Granny Apple Green for grass; Crushed Curry for stars and moon; Basic White for the scattered bones, and Them Bones DSP for the background and human, cat and dog skeletons.
MEASUREMENTS
Basic Black Large Panel: 5 1/4″ x 11″ score @ 2 5/8″, 5 1/4″, 7 7/8″, 10 1/2″ (14.2cm x 27.9cm score @ 6.6cm, 14.2cm, 20cm, 26.6cm) Small Panel: 2 – 2 5/8″ x 7 1/2 score @ 1 1/2″, 3″, 4 1/2″, 6″ (2 – 6.6cm x 19.5cm score @3.8cm, 7.6cm, 12.3cm, 15.2cm) Tombstone: 2 1/2″ x 3 3/4″ Skeleton: 2 1/2″ x 3 3/4″ (6.3cm x 10.4cm) Skeleton Brace: 1/4″ x 5″ score @ 1″ (0.6cm x 13.6cm score @ 2.5cm) Tombstone Brace: 1/2″ x 3 1/2″ score @ 1 1/2″ (1.3cm x 8.8cm score @ 1.3cm) Skeleton Brace: 1/4″ x 2 1/2″ scored @ 1″ Bottom Braces: 2 – 3/4″ x 1″ score @ 1/2″ (2 – 1.9cm x 2.5cm score @ 1.3cm) Scrap
Them Bones DSP – Mats 2 – 2 1/2″ x 3 3/4″ (2- 6.3cm x 9.5cm)
Granny Apple Green – Mats 2 – 2 1/2″ x 1 3/8″ (2 – 6.3cm x 3.4cm) 2 – 2 1/2″ x 1 3/4″ (2 – 6.3cm x 4.4cm) 2 1/4″ x 1 1/4″ (5.7cm x 3.1cm)
Pumpkin Pie Scrap
Crushed Curry Scrap
Basic White – Mats 2- 2 1/2″ x 5 1/8″ (2 – 6.3cm x 13.9cm) Scrap
CONSTRUCT CARD
1. Begin by cutting all pieces according to the measurements listed above.
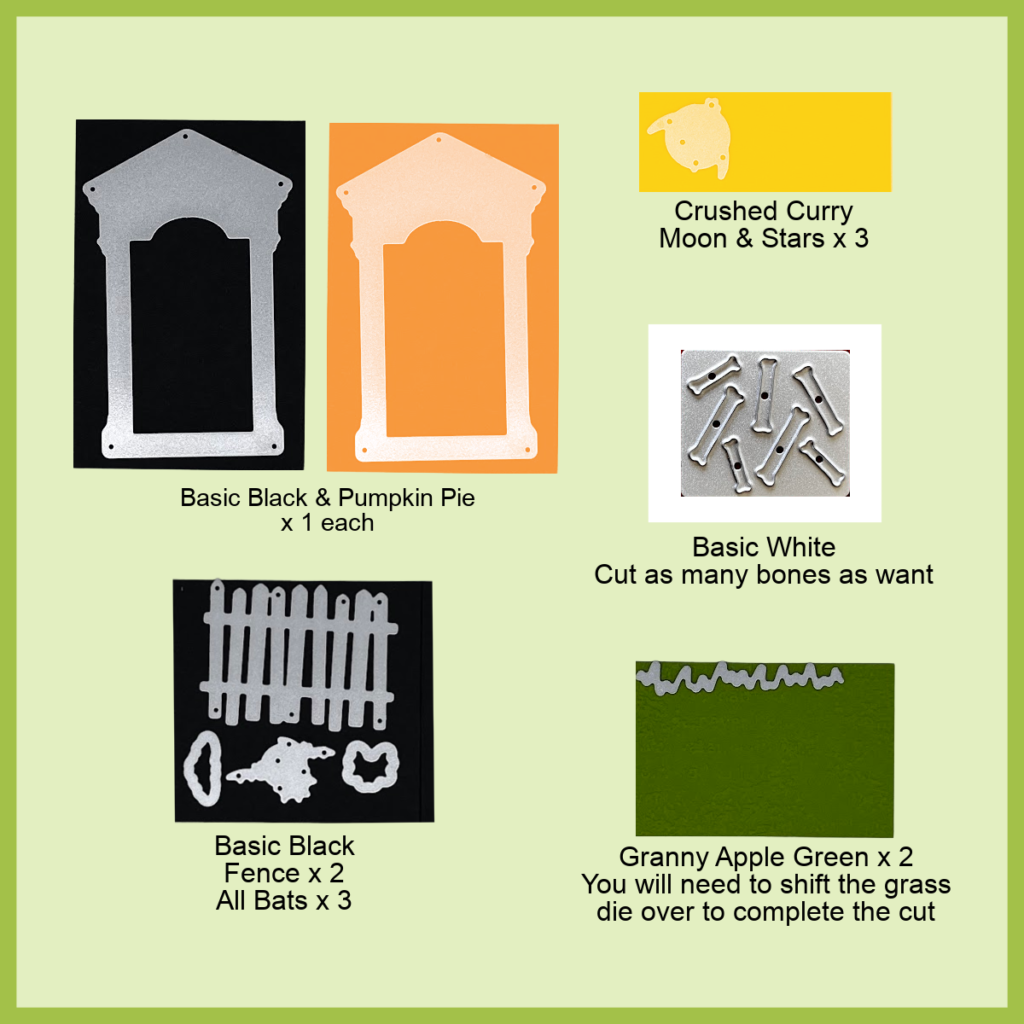
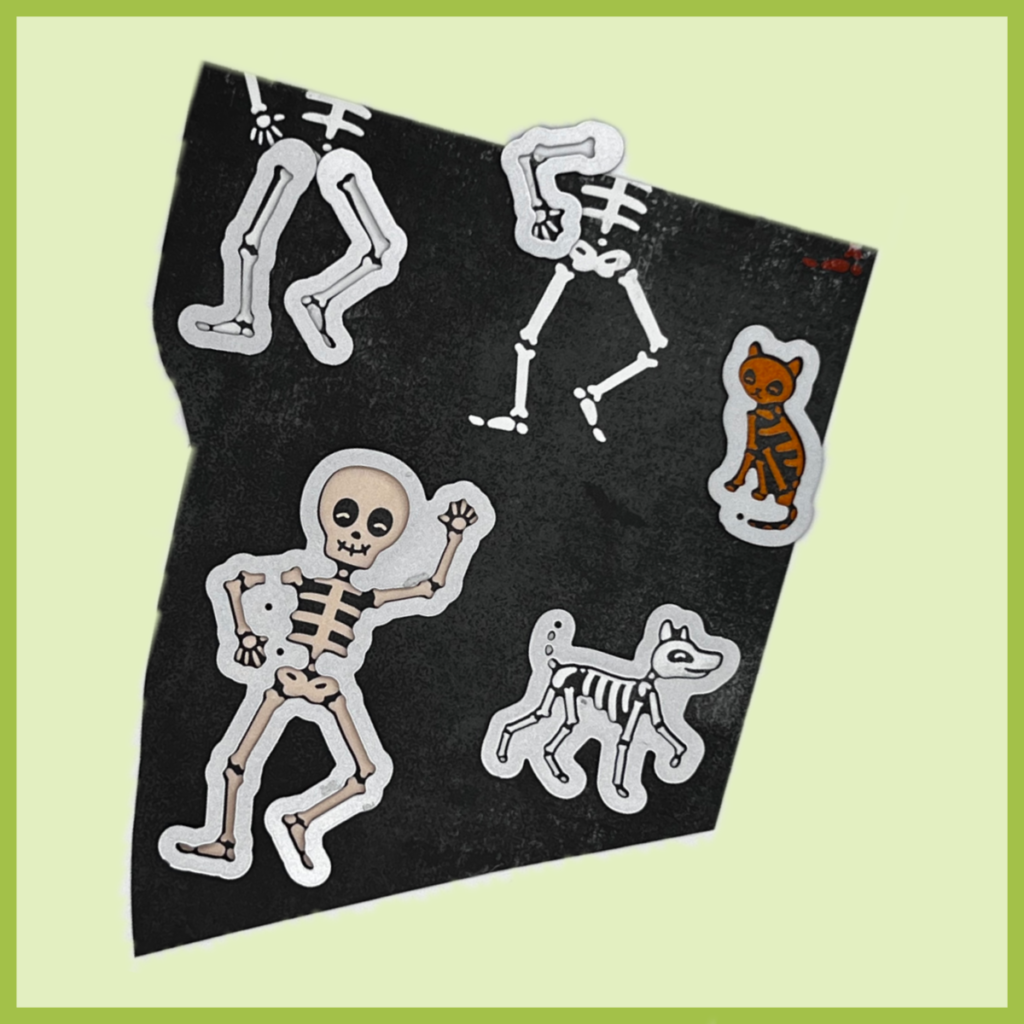
2. Die cut the following: See image for reference.
~ Tombstone Basic Black x 1 , Pumpkin Pie x 1 ~ Grass – lg Granny Apple Green x 2 ~ Fence – Basic Black x 2 ~ Bats – Basic Black, as many as you want. ~ Moon & Stars Crushed Curry x 2 ~ Bones – Basic White, as many as you want.
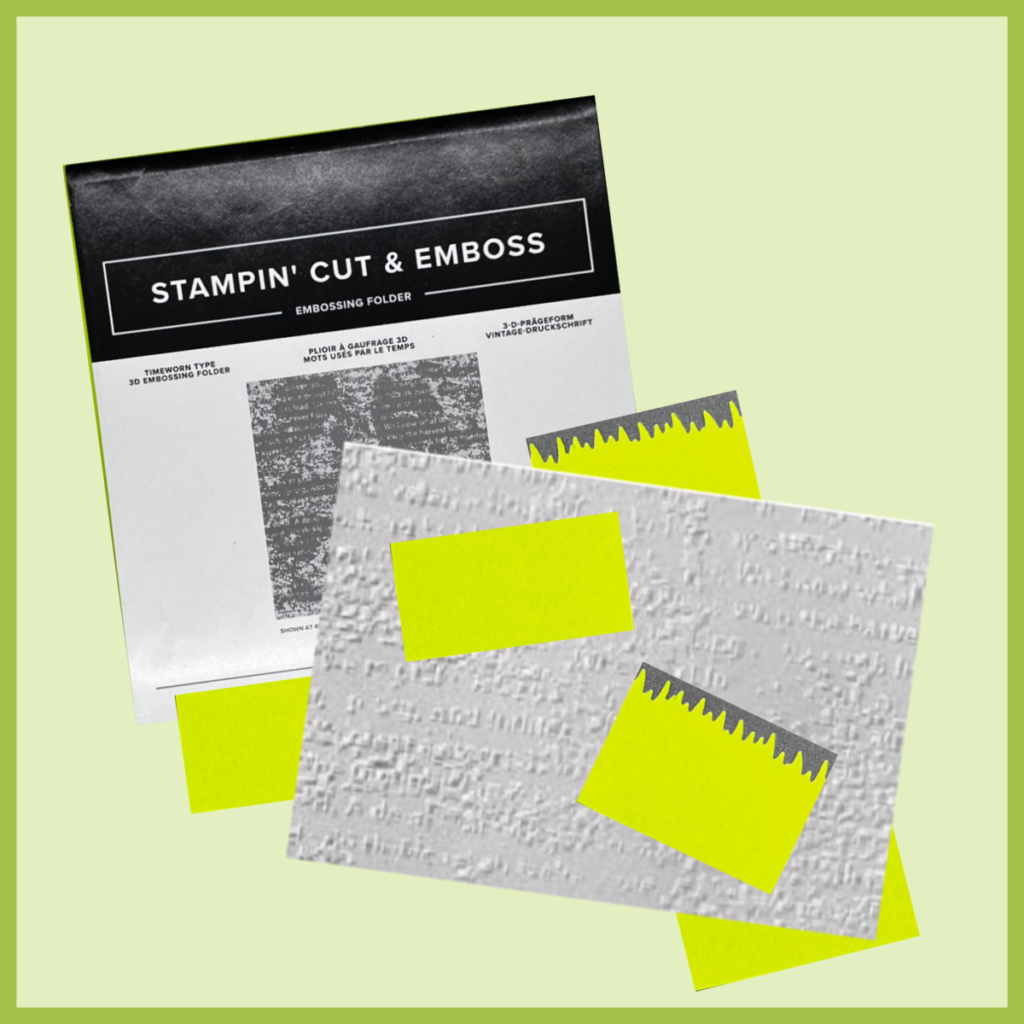
3. Insert all Granny Apple Green Pieces into the Timeworn Type 3D EF and run through the SCEM.
4. Die cut the person, dog, and cat skeleton from the DSP.
5. Die cut some of the partial skeletal pieces from the edges of the DSP using the coordinating die.
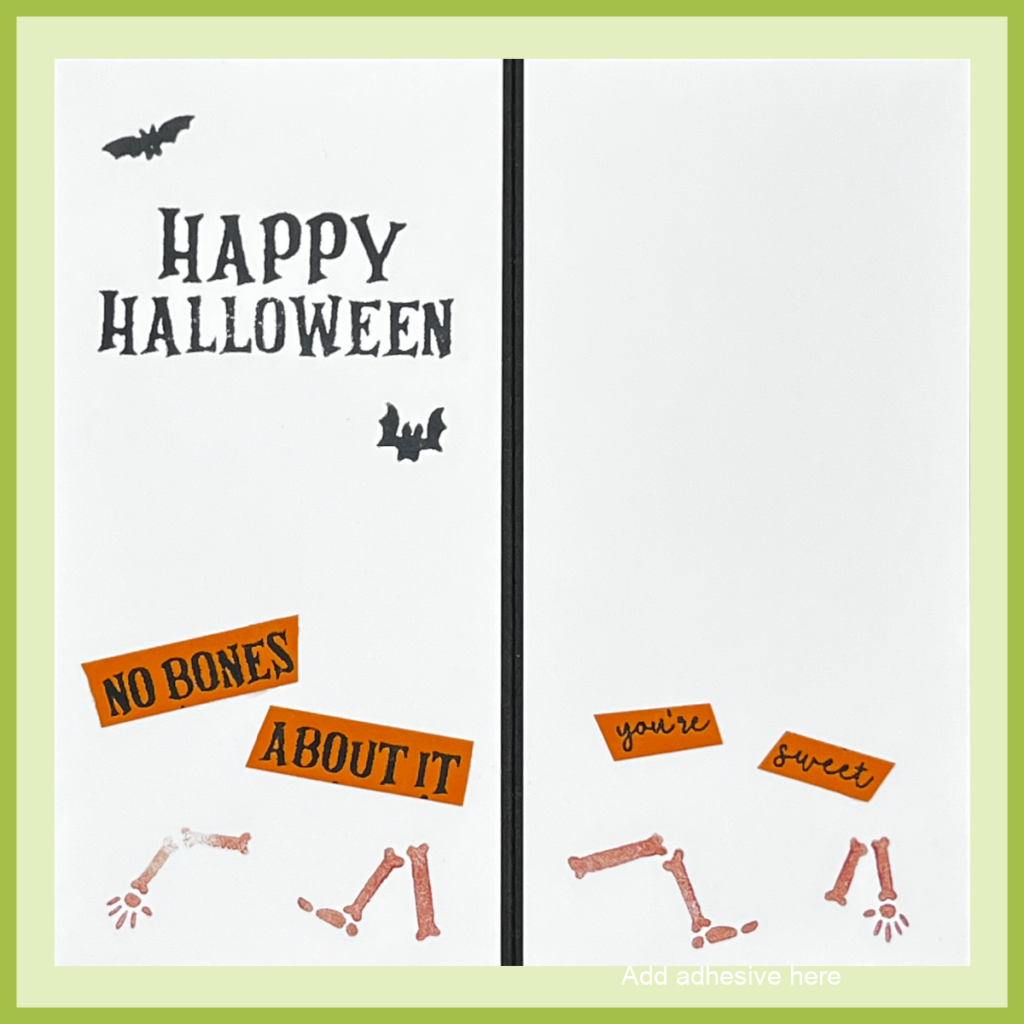
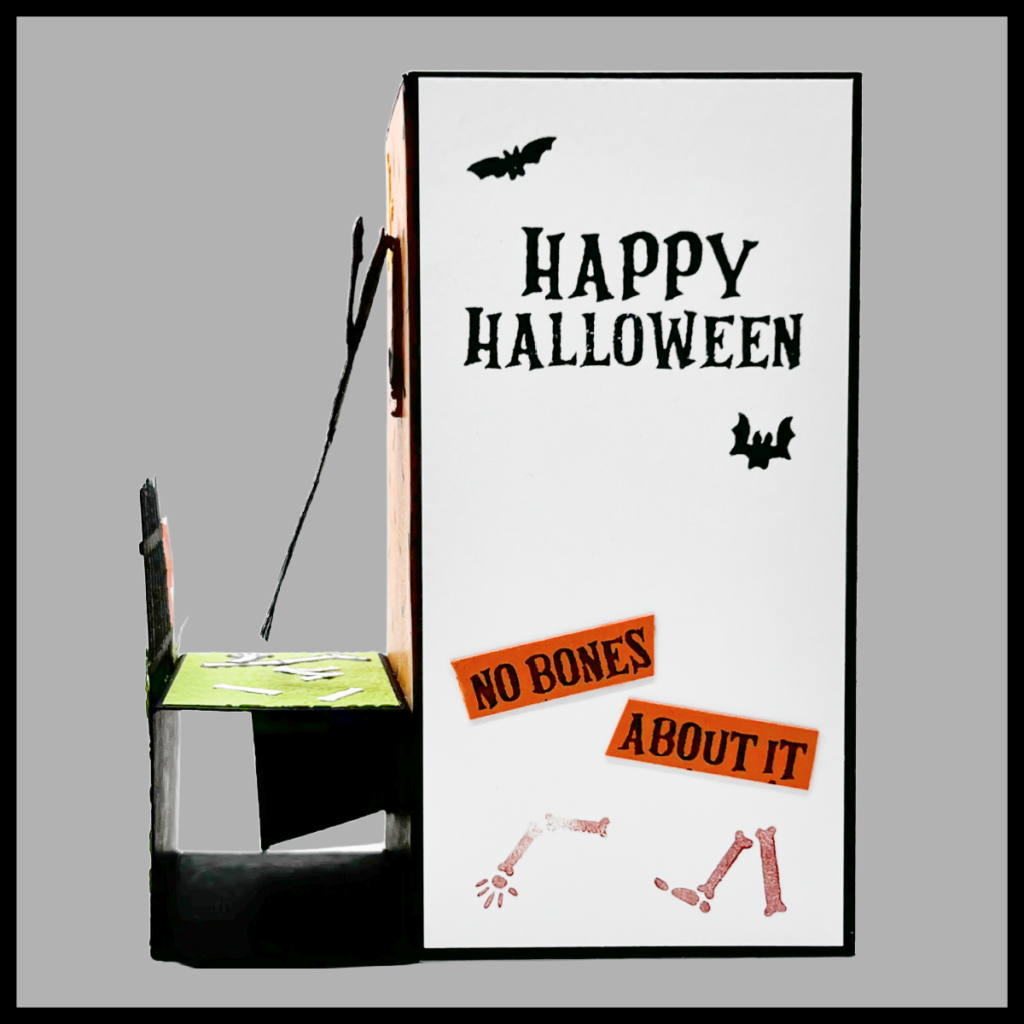
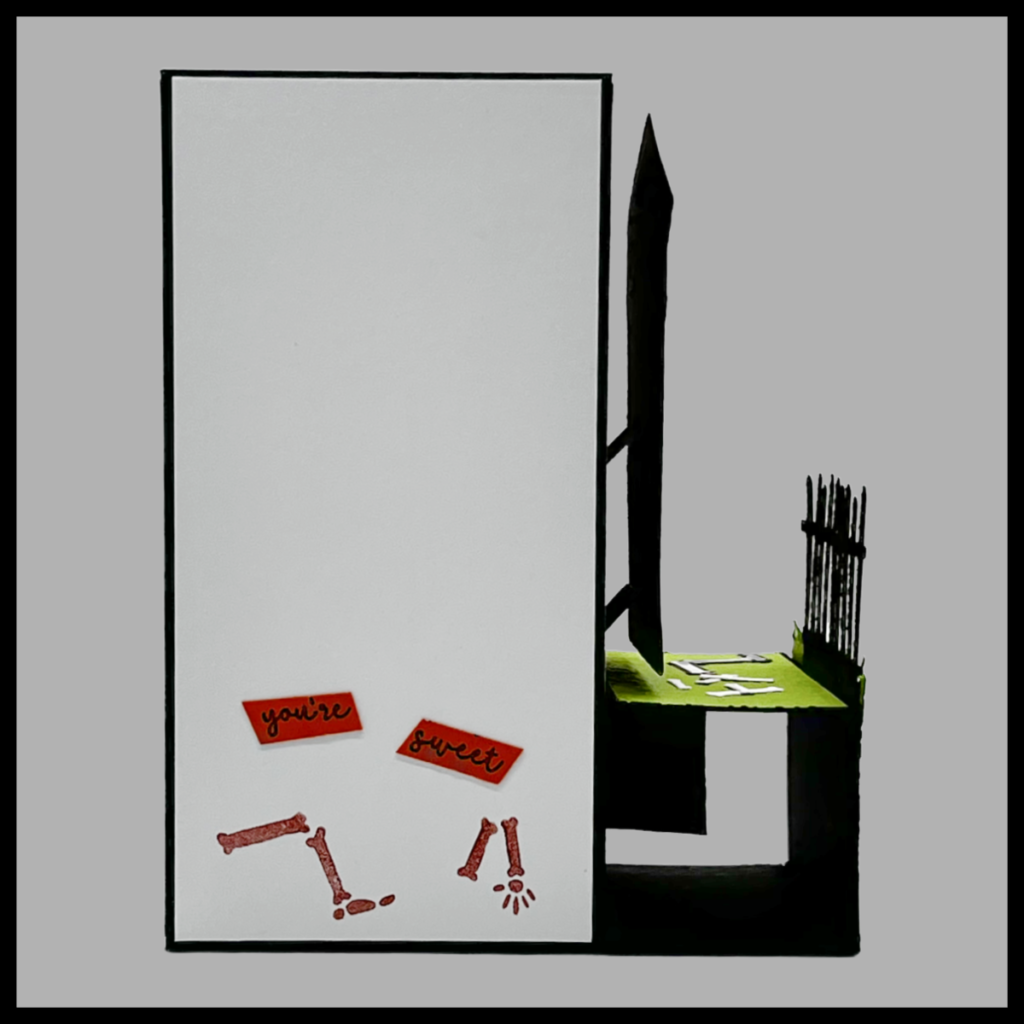
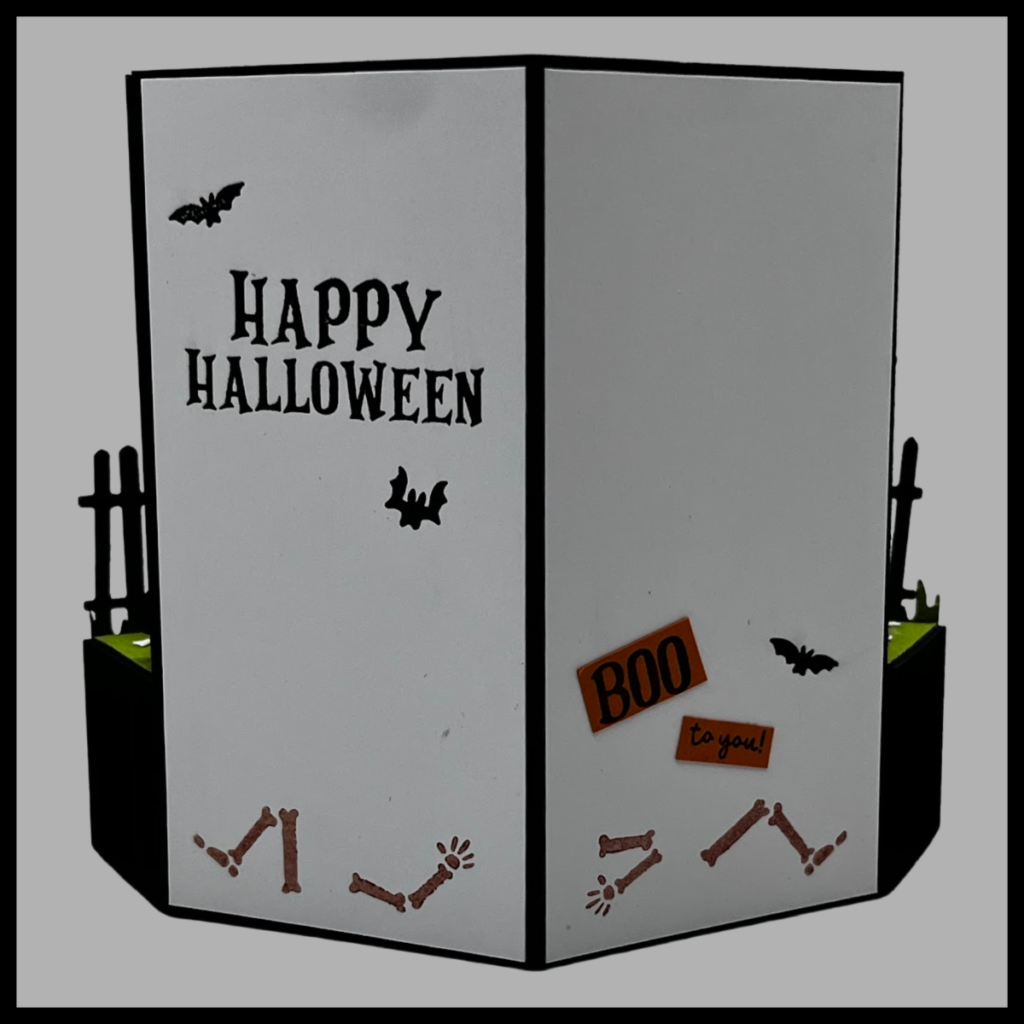
6. Decorate the 2 Basic White mats.
~ Stamp the Happy Halloween sentiment and bats with Memento’s Tuxedo Black ink.
~ Stamp various bone parts along the bottom of both Basic White panels with 2nd generation Cajun Craze ink.
~ Stamp the No Bones About It sentiment on Pumpkin Pie scrap with Tuxedo Black ink.
~ Cut the sentiment apart and adhere the words No Bones, About it, You’re, and Sweet along the bottom of both panels.
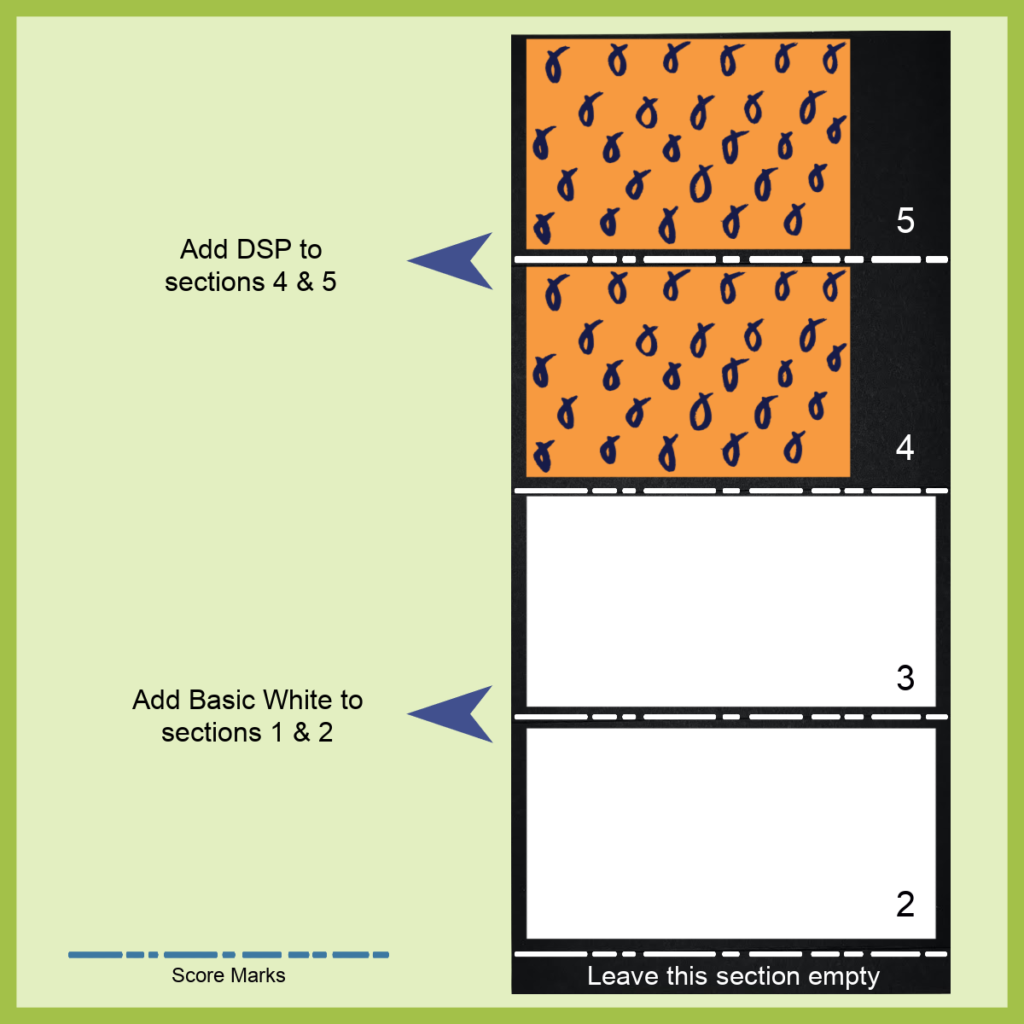
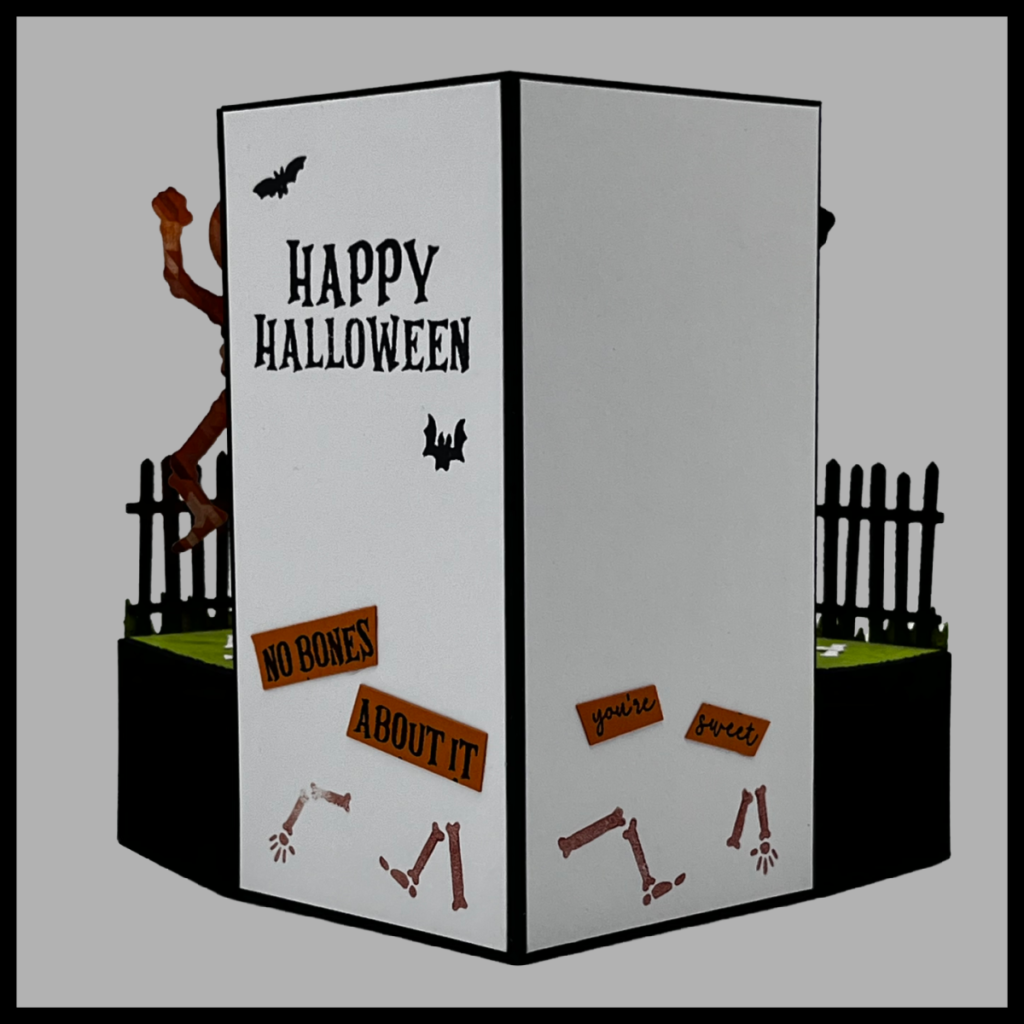
7. Score and re-flatten the 3 Basic Black panels.
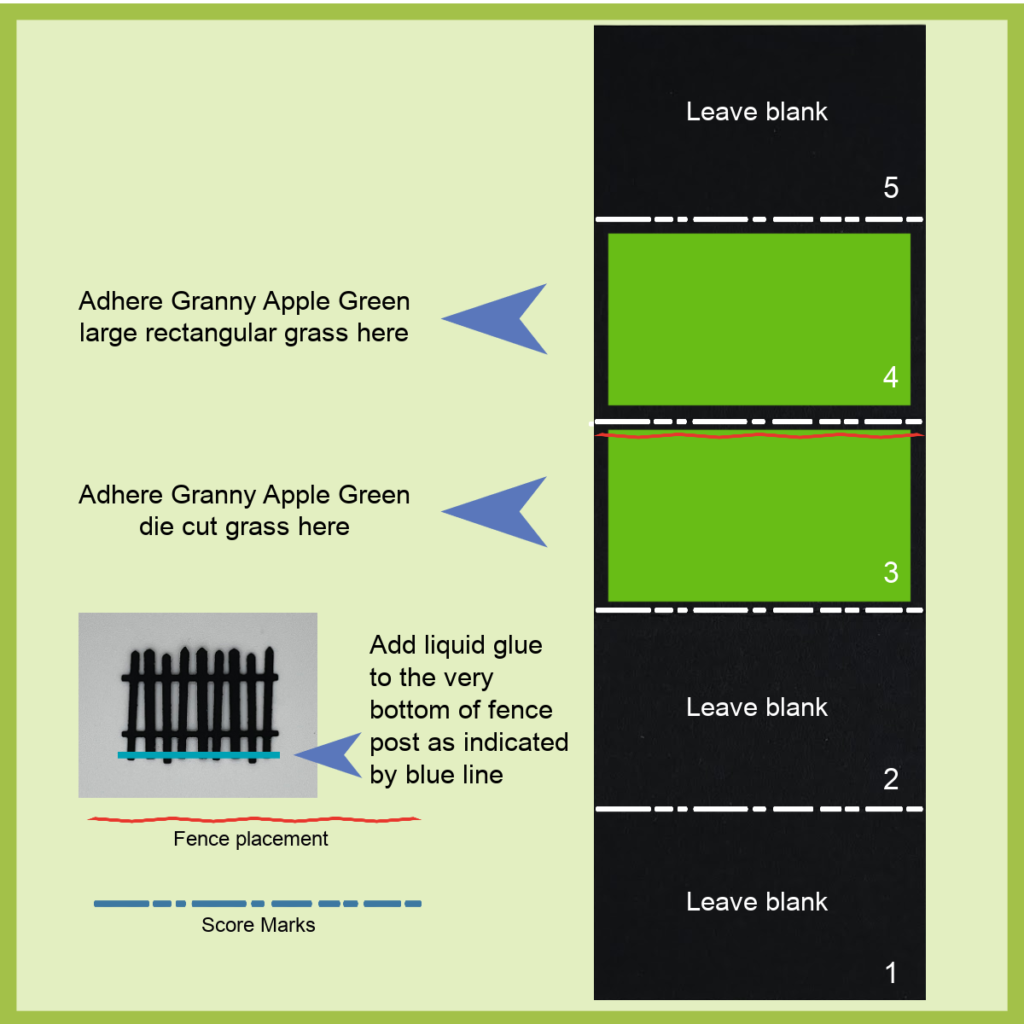
8. Decorate the large panel as follows: See image for reference.
~ Adhere the 2 decorated Basic White mats to sections 2 & 3.
~ Adhere 2 DSP to sections 4 & 5.
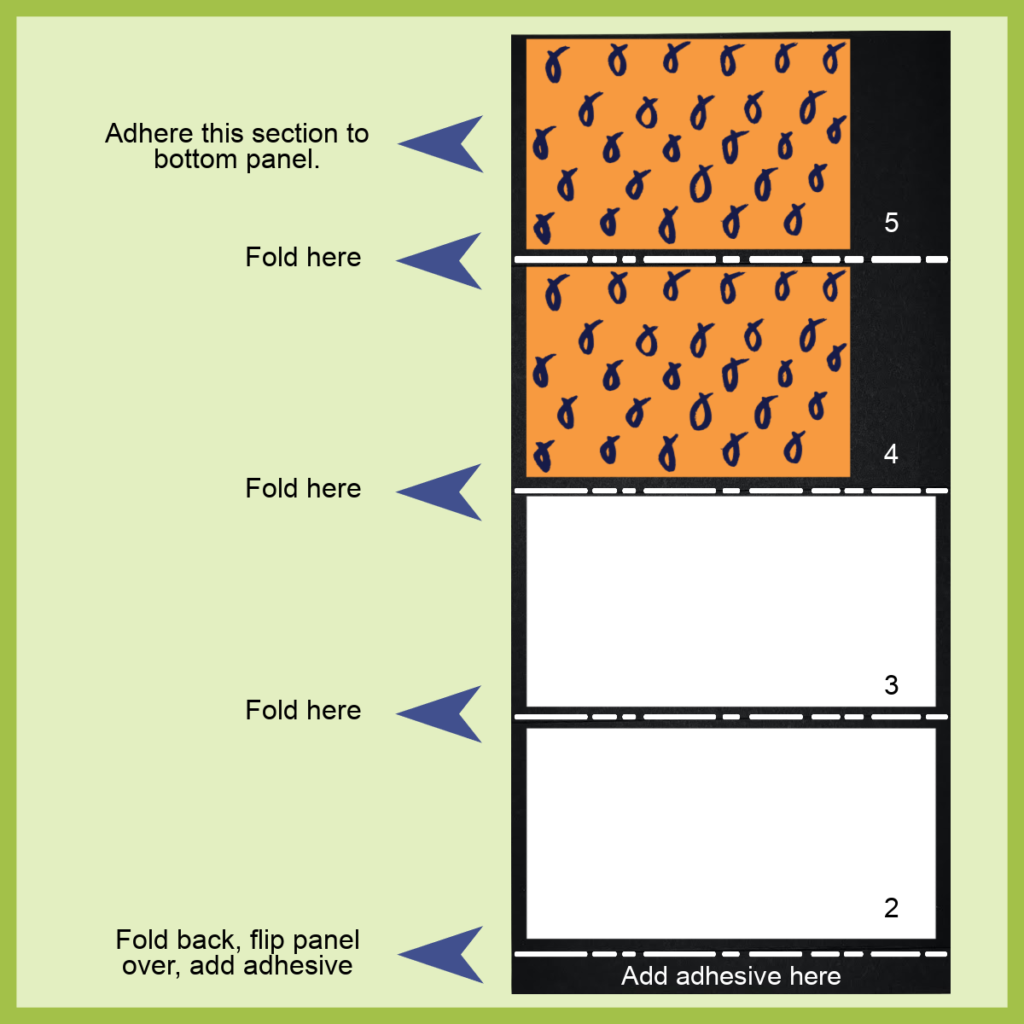
~ Add adhesive to panel to the left of Basic White mat.
~ Fold score marks to create a cube shape and adhere to other end.
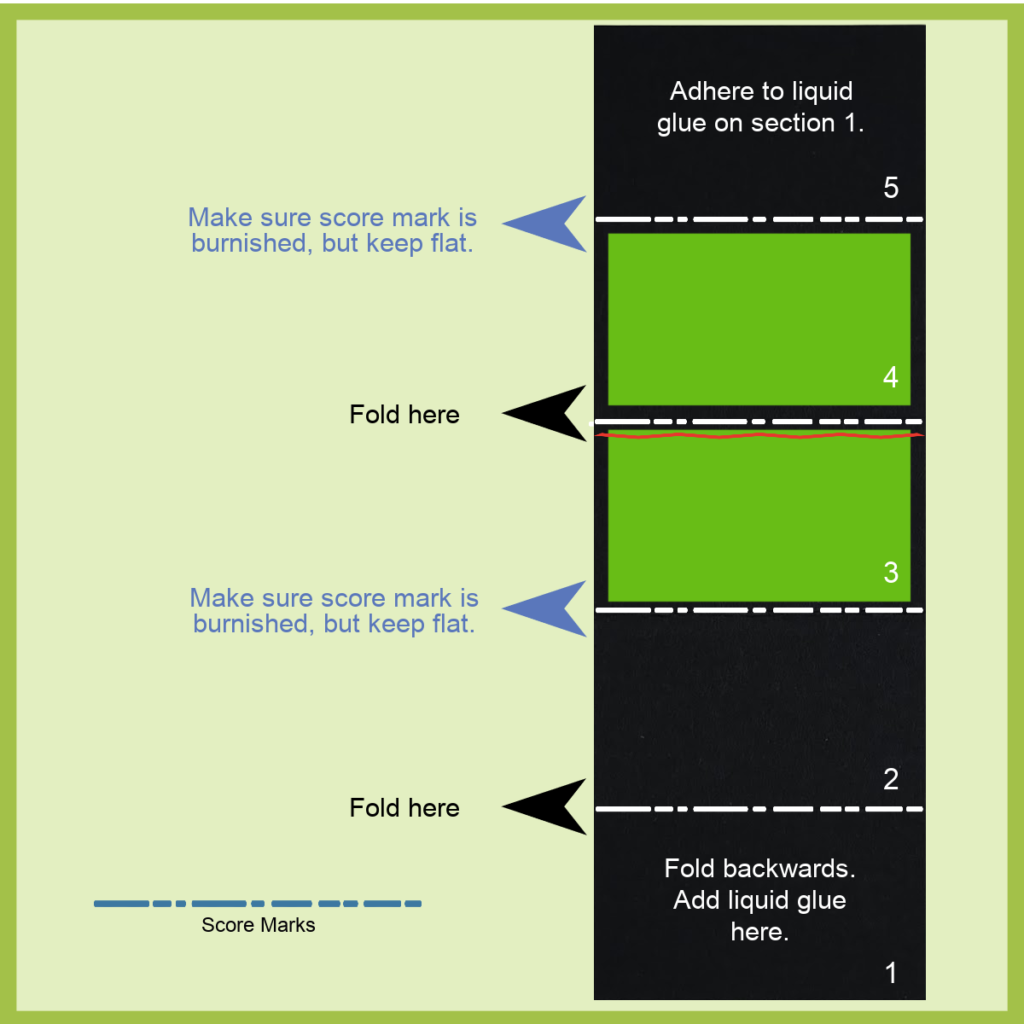
9. Construct large cube:
~ Fold score mark to the left of the Basic White section to the backwards and add liquid glue to it.
~ Fold score mark between Basic White and DSP backwards and flatten on top of section with liquid glue. Smooth flat.
Note: Make sure all score marks have been creased!
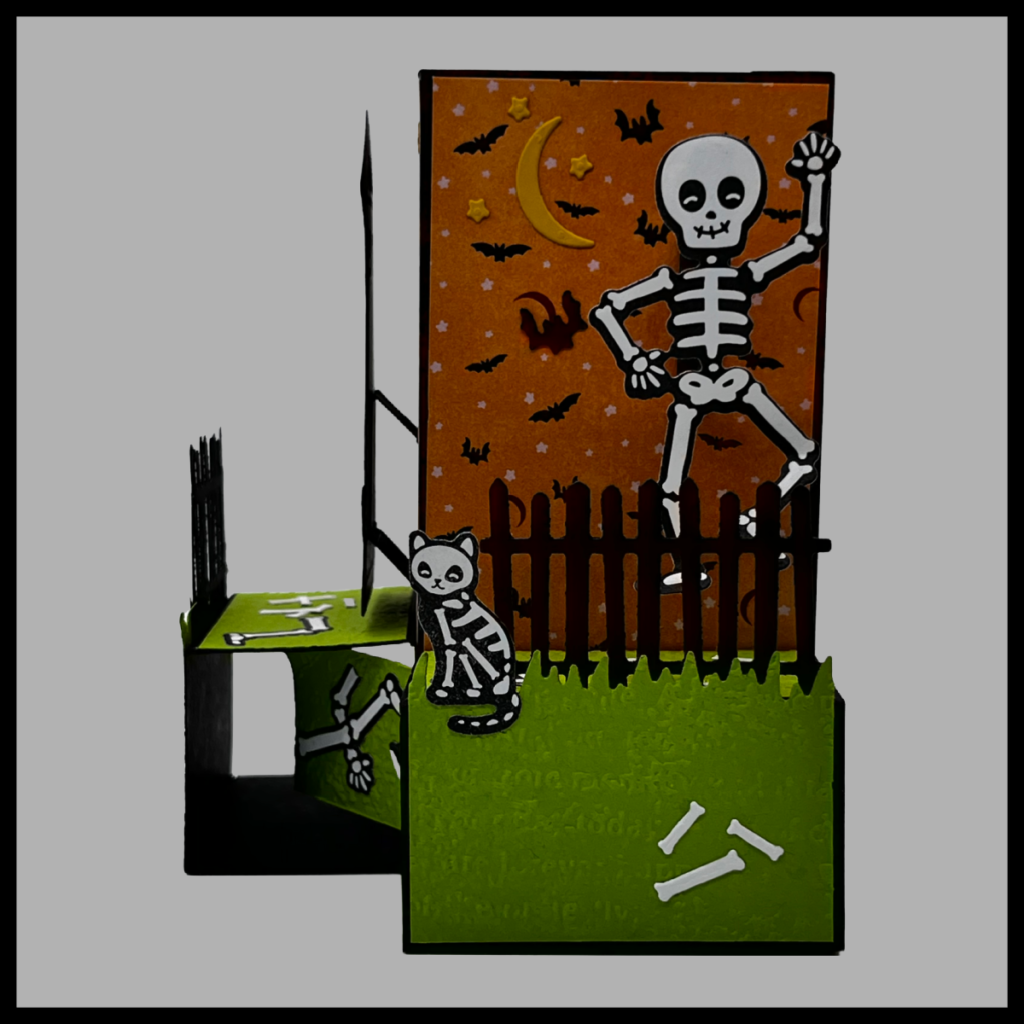
10. Decorate both smaller panels as follows: See image for reference.
~ Adhere the medium Granny Apple Green piece to section 4.
~ Add a small drop of liquid glue to the very bottom of the fence posts and adhere fence to the very top edge of section 3, just below the score mark.
~ Adhere the die cut grass piece to section 3 hiding the adhered fence posts.
~ Add adhesive to bottom section, fold score marks to create a cube shape and adhere to other end.
11. Construct small cubes:
~ Flip panel over, fold section 1 up and add adhesive.
~ Fold the rest of the cube in half between the 2 Granny Apple Green pieces, flatten, and adhere the section 5 to the adhesive.
12. Adhere cubes together.
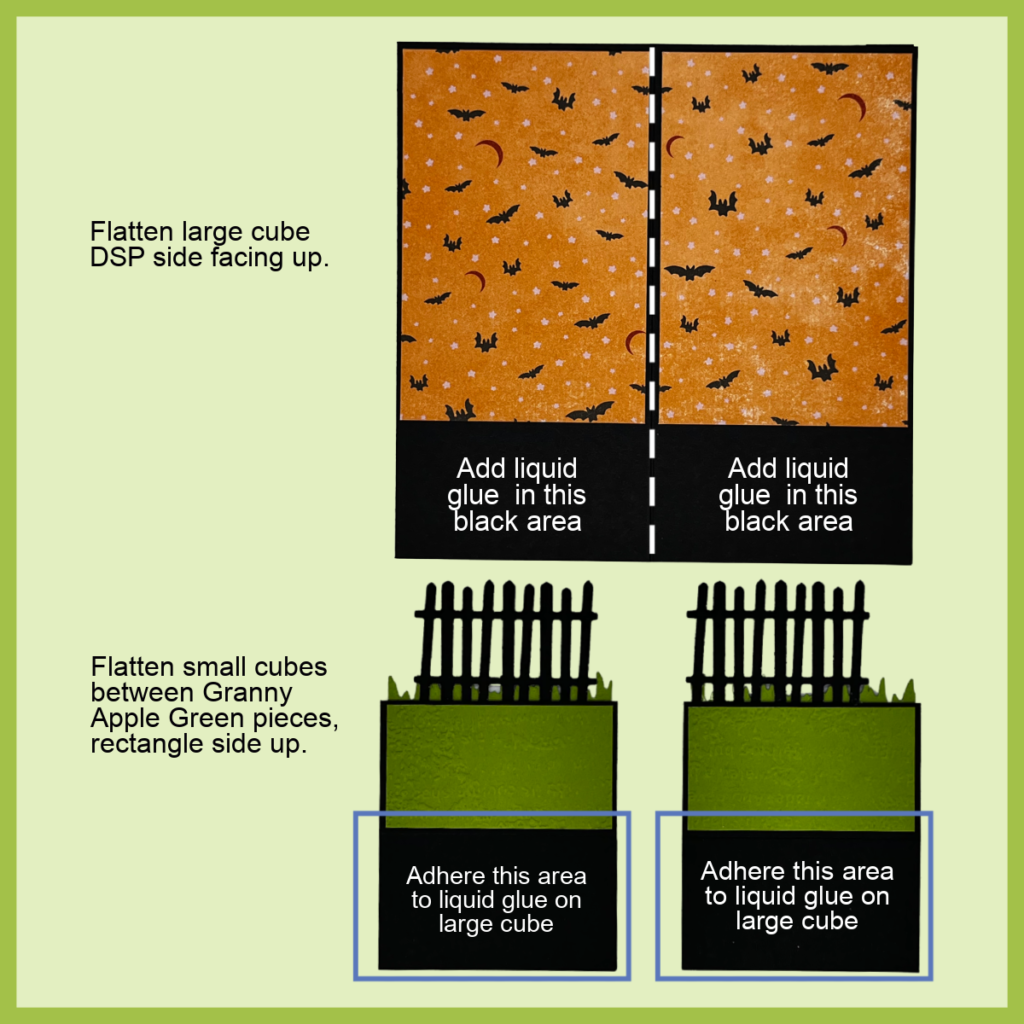
~ Flatten large cube with open end to the top and DSP facing upwards.
~ Flatten small cubes between the Granny Apple Green sections 3 &4. The open end should be to the side.
~ Add adhesive to black section on same side as the Granny Apple Green rectangle.
~ Line up the 2 sides and bottom edge of the small cube with the 2 sides and bottom edge of the DSP panels (the black section).
~ Repeat above process with remaining small cube
13. Prepare tombstone.
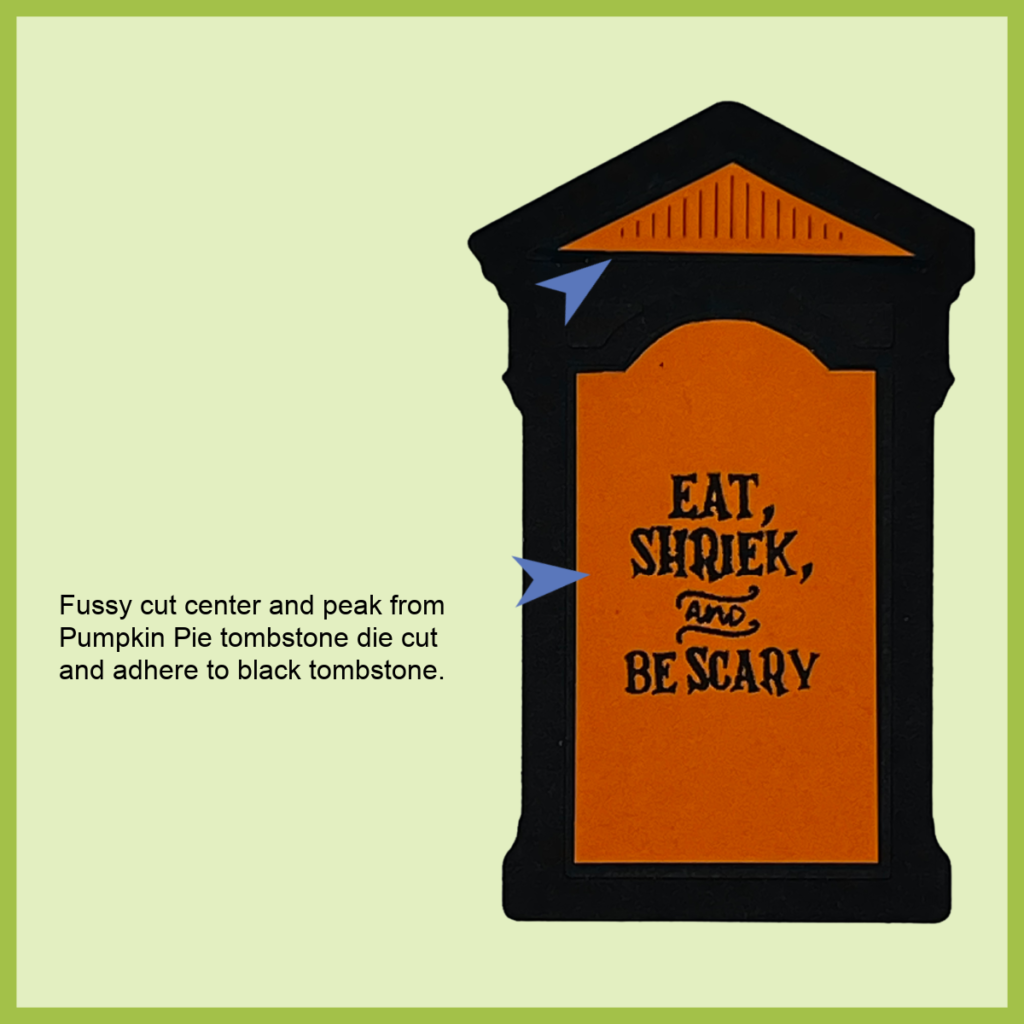
~ Fussy cut the center & peak detail out of the Pumpkin Pie tombstone.
~ Stamp the Eat, Shrek, and Be Scary sentiment on the center piece in Memento’s Tuxedo Black and adhere to the center of the Basic Black tombstone.
~ Adhere the Pumpkin Pie center and peak to the Basic Black Tombstone.
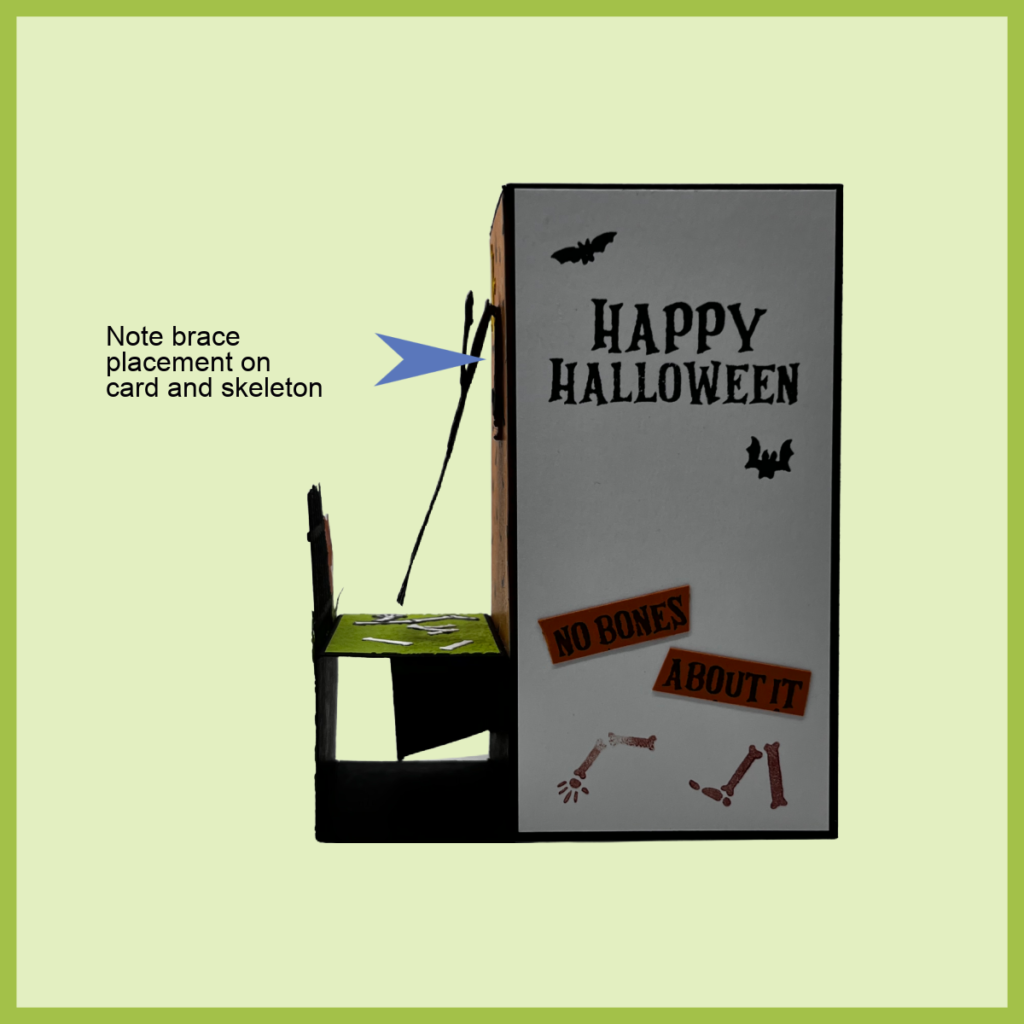
14. Add the skeleton and tombstone features to card.
~ Adhere Basic Black die cut skeleton to the back of the DSP die cut skeleton. This will make the skeleton stronger.
~ Fold the skeleton brace in half. Adhere to the back of the skeleton with scored end placed half way up the skull.
~ Flip skeleton over, keeping brace folded in half, and add liquid glue to the other folded half.
~ Adhere to DSP.
Don’t let the top of the skeleton or tombstone extend above the top of the large cube.
15. Repeat the above process with tombstone.
16. Decorate with all the extra die cuts and more! Note: The partial skeleton is only adhered to the left panel.
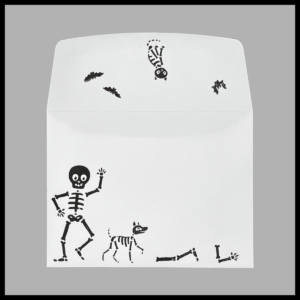
Don’t forget to decorate the envelope!
The fun of receiving snail mail begins with the envelope.
I decorated the envelope by stamping the human and dog skeletons in the front, lower left corner and some body parts along the bottom.
I stamped the cat on the envelope flap with bats flying around.
Don’t forget to check out all views at the bottom of this post!
HOP ALONG!
You may be starting here or joining me from another participating team member’s page, either way, I hope you will continue on the hop by clicking on the Blog Roll at the end of this post. Don’t forget when visiting to leave them a little “love.” Please ask if you have any questions.
(Insert Blog Roll)
FREE TUTORIAL BUNDLES
AUGUST BUNDLEi Inked & Tiled
Place a $50 order with me by Wednesday, August 31st and receive this month’s Inspirations In Ink Tutorial containing 7 project using the Inked & Tiled Bundle (Inked Botanical Suite) designed by talented Stampin’ Up! Demonstrators world-wide.
-PLUS-
Receive one of my customer Thank you cards with a PDF so you can create it yourself.
SEPTEMBER BUNDLE FOCUS FUN FOLDS
Beginning September 1st, receive a bundle filled with 6 fun fold tutorials. All designs are different! This bundle is FREE with a $50 purchase during the month of September.
-PLUS-
Receive one of my customer Thank you cards with a PDF so you can create it yourself.
HOP ALONG!
You may be starting here or joining me from another participating team member’s page, either way, I hope you will continue on the hop by clicking on the Blog Roll at the end of this post. Don’t forget when visiting to leave them a little “love.” Please ask if you have any questions.
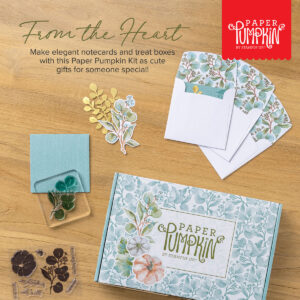
Express your love and gratitude in elegant style with the September Paper Pumpkin Kit inspired by Shelli!
This kit includes:
8 treat packages
8 note cards
8 coordinating envelopes
1 photopolymer stamp set
1 Lost Lagoon Ink Stampin’ Spot
Specialty gold foil, precut embellishments
Adhesives
Coordinating Stampin’ Up! colors: Copper Clay, Crumb Cake, gold foil, Lost Lagoon, Mossy Meadow, Pebbled Pat
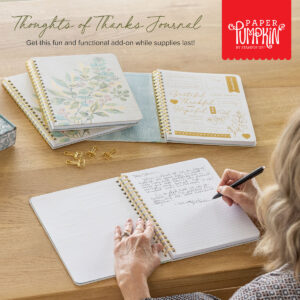
THOUGHTS OF THANKS JOURNAL
A FREE Journal is included if you subscribe by August 10. Don’t wait, order yours today!
Why save gratitude for special days when you can savor it every day by writing it down in an inspiring journal?
The Thoughts of Thanks Journal is an add-on option featuring the same colors and elegant designs as the With Love & Gratitude Paper Pumpkin Kit. It also comes with two specialty gold foil sticker sheets to accent the 8″ X 10″ journal pages and help remind us of all the reasons to be grateful.
This journal will be available for sale starting September 11th and will only be available while supplies last.


2 Comments
Christy Gridley
WOW!!! Fabulous & spooky fun fold Deirdre!!
Vicky W
WOW! This is fantastic Dieirdre. Love it!