The Stamping Muse

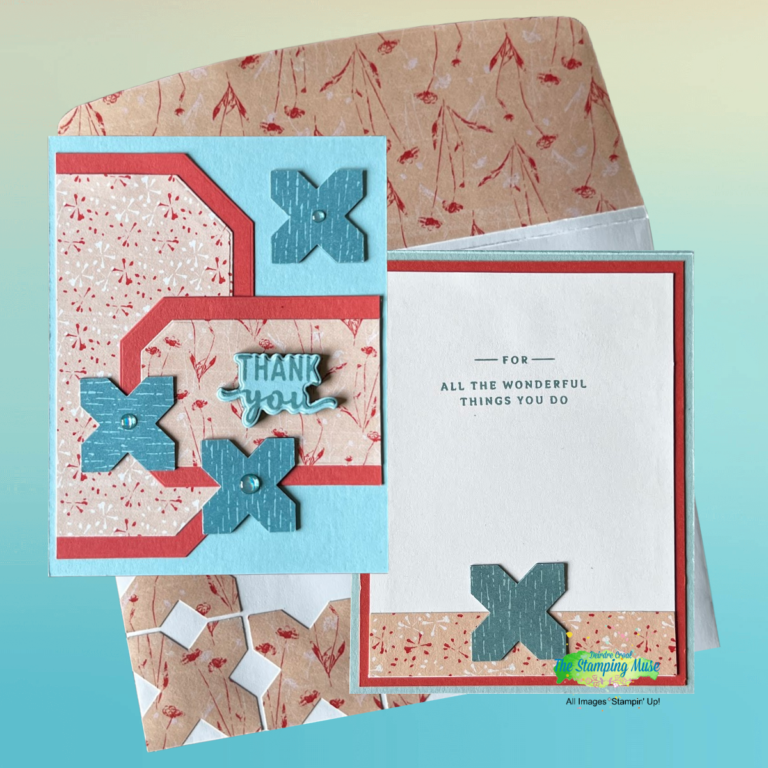
Masculine Pocket Fun Fold Card using the Winter Meadows Suite

Today I am presenting a simple masculine Pocket Fun Fold card using the Winter Meadow DSP & Magical Meadow stamp set. This simple birthday card will deliver warm wishes to any of the amazing men in your life, especially if they love the outdoors. Give this card a try, then enjoy putting your spin on it.

So much is going on this week! Here is a preview. Check the bottom of the post for more information.

  1. The September-December Mini Catalog go live today, Wednesday, September 6th.
  2. Stampin’ Up! is also offering 5 new DSPs for a limited time starting today. Click out the link below for more information.
  3. Need a jump start on Holiday cards? Check out the new Christmas Everywhere kit featuring a variety of different holiday tree designs including Palms. More information below.
  4. Stampin’ Up! is adding 2 Christmas mugs to their branded merchandise collection on 6 September! They will be available while supplies last.

Today’s card is a simple pocket card meant to send a quick note of well wishes to the men in your life. This one is for his birthday.

From the Winter Meadow DSP pack I selected this beautiful scenery piece for the insert front to create this card.

The back of another piece of DSP found in the same pack is what I used for the background piece of DSP. (The blue trees & mountain piece to be exact.) The soft color of the background pieces may make it bit difficult to see in the photos, but I promised you will use them for other projects as well!

The colors used for this card include:

  • Misty Moonlight
  •  Boho Blue

NOW LETS CREATE

NOW LET'S CREATE!

Misty Moonlight
     Card Base  – 4 1/4″ x 5 1/2″   (29.5cm x 10.4cm)
     Corner – 3 1/2″ x 3 1/2″   (8.8cm x 8.8cm)
Boho Blue
     3 1/2″ x  4 1/4″   (8.8cm x 11.7cm)
     2 1/2″ x 1″   (6.3cm x 2.5cm)

Basic White
     3 1/4″ x 4″   (8.2cm x 11.1cm)
     2″ x 1/2″   (5cm x 1.3cm)

Winter Meadow DSP
     Deer Scene – 3 1/2″ x 4″ (8.8cm x 11.1cm)
     Gray Abstract – 4″ x 5 1/4″   (11.1cm x 14.2cm); 3 1/4″ x 3 1/4″ (8.2cm x 8.8cm)

PREP THE CARD BASE

  • Cut all pieces according to the measurements section below.
  • Cut the 3 1/2″ x 3 1/2″ Misty Moonlight piece from corner to corner, starting at the top left to the lower right. Repeat this process with the 3 1/4″ x 3 1/4″ DSP.
  • Stamp the exterior birthday greeting on Basic White small label.
  • Stamp the interior birthday greeting on the Basic White mat.
  • Die cut the smallest frame from the small piece of Boho Blue.

ASSEMBLE CARD

  • Adhere the gray abstract DSP to the Misty Moonlight card base.
  • Adhere the right angle DSP piece that fits along the left & bottom edges, to the coordinating Misty Moonlight piece.
  • Add 1/4″ Tear & Tape along the left and bottom edge of the right angle piece and adhere it to the lower left corner of the card base.
  • Adhere the Basic White exterior sentiment label to the Boho Blue Countryside corners die cut label.

ASSEMBLE THE POCKET CARD INSERT

Lorem ipsum dolor sit amet, consectetur adipiscing elit. Ut elit tellus, luctus nec ullamcorper mattis, pulvinar dapibus leo.

  • Adhere the DSP Scene piece and the Basic White mat to the coordinating Boho Blue mat.
  • After DSP and Basic White mats are adhered, punch a hole in the top center of the mat using the using the Very Best Trio punch.
  • Thread a piece of the Misty Moonlight Inner Braided ribbon through the hole and cut to length. Add a piece of Tear & Tape on the back side of the ribbon (non-braided side) toward the top edge of on end and squeeze both ends together.

EMBELLISH

  • Add 2 gray Classic Matte Dots to the corner piece and 1 Classic Matte Dot to the the DSP scene.

Don’t forget to decorate the envelope!

The fun of receiving snail mail begins with the envelope.

I simply stamped the front, lower left corner with one of the stamps from the Magical Meadow stamp set.

Other ways to decorate an envelope include:

  • Dry emboss the envelope flap.
  • Stamped the envelope flap, along the left edge, or across the bottom.
  • Adhere DSP along the front left edge and/or across the bottom.
  • Die Cut a label out of DSP large enough to adhere a mailing label of the addressee on it and still see the design of the DSP peaking out around the edges of the mailing label.

SEPTEMBER'S FREE TUTORIAL

Place a $50 order with me by Saturday, September 30th and receive this month’s Inspirations In Ink Tutorial containing 6 Fund Fold projects designed by talented Stampin’ Up! Demonstrators world-wide.

-PLUS-

Receive one of my customer Thank you cards with a PDF so you can create it yourself.

HAPPENING THIS WEEK

Click on image to view the 2023 September-December Mini Catalog!
Please be sure to select me as your demonstrator. Thank you!
Click image to see the all 5 packs of special release DSP.
Click on image to view kit!

This kit includes: 

  • Enough supplies to create 9 cards—3 each of 3 designs
  • 9 coordinating envelopes
  • Christmas Everywhere photopolymer stamp set
  • One Lost Lagoon Ink Spot
  • Printed card bases, printed die-cut labels and images with red glitter, adhesive, and a clear block
  • Finished card size: 5-1/2″ x 4-1/4″ (14 x 10.8 cm)
  • Coordinating colors: Granny Apple Green, Lost Lagoon, Pecan Pie, Pretty Peacock, Real Red

Order the Christmas Everywhere Kit today!

PRODUCTS NEEDED

SUPPLIES TO GATHER

Leave a Reply

Your email address will not be published. Required fields are marked *