Halloween is probably one of the holidays people least expect to receive holiday greetings. Since my first niece moved away to college I have sent a card filled with a sweet treat to all unsuspecting hard, studing nieces and nephews.
I have been busy working to create a unique and different card for each one this year. Today’s card is filled with the colors of the season and would be perfect for the boy child in your life.
I have already posted a triple cube fun fold if you would like to check that one out as well.
This fun card is filled with the browns, golds, and blacks of Halloween and the fall season in general. Colors include:
CARD PREP
Cut all pieces as listed in the measurements section.
Die cut 1 large tombstone, 3 small winged and 2 large winged bats out of the Basic Black Scrap.
Die cut one of the little skeleton guys out of the small skeleton DSP using the small tombstone die.
Heat emboss the exterior sentiment. ~ Rub a small piece of Basic Black scrap with the Embossing Buddy. ~ Stamp the Bone-Jour sentiment with VersaMark ink. ~ Sprinkle with white embossing powder. ~ Tap off excess embossing powder. ~ Brush away any remaining, but unwanted embossing powder with a stiff bristles brush. ~ Melt embossing powder with the heat tool until the sentiment appears a glossy white.
Stamp the interior sentiment on the Basic White mat. I took an optional step of blending a tombstone image over the sentiment with Cajun Craze ink using the remains from my tombstone die cut. See image below.
Add the DSP to the coordinating mats.
ASSEMBLE CARD FRONT
Fold card base and burnish with bone folder.
Adhere the larges DSP mat on the far left side of the Cajun Craze card base.
Adhere a 1 1/4″ to the back, right edge of the 2nd larges mat. (This extra piece will adhere directly to card base.)
Adhere 2nd larges mat to the card base making sure the right border spacing is equal to the left border spacing and is centered from top to bottom.
Add dimensionals to the back of the small DSP tombstone and adhere to the larger Basic Black Tombstone.
Add dimensionals to the back of the large Basic Black Tombstone and adhere to the lower, right corner of the smaller compiled mat.
Cut the sentiment to size, add a single mini-dimensional to back, left edge, add liquid glue to the right edge, and adhere the liquid glue edge to the tombstone and the dimensional to the mat. (See photo for placement.)
Add the 3 small bats to the card front.
Embellish the 3 bat silhouettes with 3 Glow-in-the-Dark Bats on top of them.
CARD INTERIOR
Adhere the DSP strip to the bottom of the Basic White mat.
Adhere the 2 remaining mats to the mat.
Adhere the Basic White mat to the Basic Black mat.
Adhere compiled mat to the card base interior.
I had the little leg die cut left over from another project, so I added it to the DSP at the bottom, but this is optional.
Don't forget to decorate the envelope!
The envelope is the where the excitement of receiving snail mail begins.
Adding a sentiment to the envelope is a fun way to share warmth with all who come in contact with the envelope!
A sentiment can be added alone, or with and image. The choice is up to you.
A list of products used can be found at the end of this post. Let me know if you have questions.
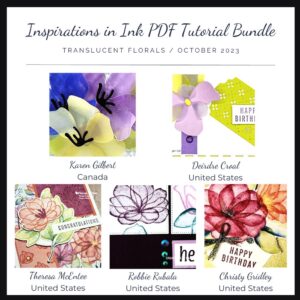
Place a $50 order with me by Tuesday, October 31st and receive this month’s Inspirations In Ink Tutorial featuring 5 projects created with the Translucent Florals Bundle and designed by talented Stampin’ Up! Demonstrators world-wide.
-PLUS-
Receive one of my customer Thank you cards with a PDF so you can create it yourself.
This month’s kit comes with everything you need to make traditional Christmas treat packaging boxes that you can fill up with all sorts of small goodies, treats, gifts, and more.
Plus,
It coordinates with the October Home for the Holidays Paper Pumpkin Kit! It is only available while supplies last.
PLUS – Get free admission to the November 2023 OnStage @ Home Stampin’ Up! event.
Ends October 31st, so don’t wait
PRODUCTS USED
NOTE: the Bag of Bones Bundle, Them Bones DSP, and Glow In The Dark Bats & Ghosts are all included in the Them Bones Suite, so don’t order them if you are ordering the Suite unless you want duplicates!


")
")
 Designer Series Paper")


")


