The Stamping Muse

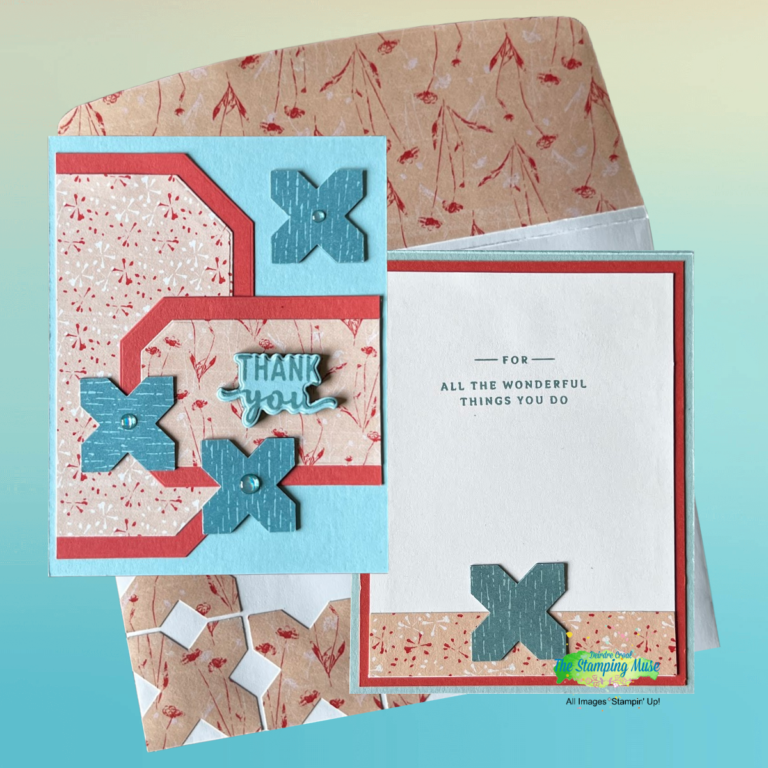
Create A Quick Inked Botanicals Card With Simple Layout

Card #2 focuses on showcasing the Inked Botanical DSP to create this quick card. If you CASE this card, please share your creation in the comments below. Enjoy!

Don’t forget, if you made any purchases in July you have coupons to use in my Stampin’ Up! store. See details below.

The subtle colors used to create this card coordinate with the colors used in the DSP. They may be soft colors, but the combination sends a calming and sincere message.

 The colors used include:

  • Coastal Cabana
  •  Calypso Coral
  • Lost Lagoon
  • Petal Pink

This simple layout allows you to display multiple patterns of the Inked Botanicals DSP. Although the measurements listed below only call for 2 patterns, I chose to use 3 patterns of the DSP on this card.

PREP THE CARD

  • Stamp the exterior sentiment on Coastal Cabana scrap and interior sentiment on
    Basic White mat using Lost Lagoon Ink.
  • Die cut the following with DSP #1:
    Please note the positioning of the pieces on the card front. The mat for die cutting
    will not fit the whole die since you will only use part of the die cut.
    ~Position & secure Countryside Corners die #1 & die #3 on Calypso Coral paper.
    ~Position & secure dies #2 & #4 on Inked Botanicals DSP.
    ~Position & secure coordinating Charming Sentiments die to exterior sentiment.
    ~Run all through the SCEM.
  • Punch the following with DSP #2:
    ~ 4 “X” images using the punch from the Tiled Punch Pack.
    ~4 more using Coastal Cabana scrap.

ASSEMBLE CARD

  • Adhere the Countyside Corner DSP die cuts to the coordinating Calypso Coral mats.
  • Adhere 1 DSP punched image to 1 Coastal Cabana image giving you 4 punched images.
  • Adhere the large mat vertically, centered from top to bottom making sure to leave a small
    card base border along the left edge.
  • Adhere the small mat horizontally, 2″ from the top edge making sure to leave a small
    card base boarder along the right edge.
  • Add dimensionals to the back of the exterior sentiment and adhere it
    centered on the horizontal DSP mat.
  • Adhere the punched images with liquid glue.  (See above image to assist with placement.)
    ~1 in the empty area in the top right corner of the card base.
    ~Line 1 up withthe bottom angeled edge of the horizontal Calypso Coral mat.
    ~Line 1 up so the left edge of the top left arm lines up with the image to the left.

EMBELLISH

  • Add a Glossy Dot to the center of each punched image.

(The dies will not fit the paper size because the whole die cut is not being used, so please note the placement of pieces in the image above when die cutting.)

ASSEMBLE THE INSIDE

  • Adhere the strip of DSP #1 to the bottom of the Basic White mat.
  • Adhere the remaining punched image, centered, to the bottom of the mat.
  • Adhere the Basic White mat to the Calypso Coral mat and add compiled mat to the inside of the card base.

MEASUREMENT

  • Card Base, Coastal Cabana – 4 1/4″ x 11″ score @ 5 1/2″
    Scrap
  • Calypso Coral
    3 1/4″ x  5 1/4″
    3 1/2″ x 2 1/2″
    4″ x 5 1/4″
  • Basic White
    3 3/4″ x 5″
  • Inked Botanicals DSP #1
    2 1/4″ x 4 3/4″
    3 1/4″ x 2″
    3/4″ x 4″
    6″ x 2 1/4″
  • Inked Botanicals DSP #2
    Scrap

Don’t forget to decorate the envelope!

The fun of receiving snail mail begins with the envelope.

I decorated this envelope by adhering a coordinating piece of DSP to the envelope flap then trimmed it to fit. I also added punched images to the front. Add as few or as many that make you happy.

Other ways to decorate an envelope include:

  • Dry emboss the envelope flap.
  • Stamped the envelope flap, along the left edge, or across the bottom.
  • Adhere DSP along the front left edge and/or across the bottom.
  • Die Cut a label out of DSP large enough to adhere a mailing label of the addressee on it and still see the design of the DSP peaking out around the edges of the mailing label.

AUGAUST'S FREE TUTORIAL

Place a $50 order with me by Thursday, August 31st and receive this month’s Inspirations In Ink Tutorial containing 7 project using the Inked Botanicals Suite (Inked & Tiled Bundle) and designed by talented Stampin’ Up! Demonstrators world-wide.

-PLUS-

Receive one of my customer Thank you cards with a PDF so you can create it yourself.

HAPPENING THIS WEEK

REDEEM NOW!

  • All coupons can be redeemed until August 1-31.
  • There is no limit to the number of coupon codes you can redeem on an order.
    Using multiple codes? Separate them with a space.
  • Coupons may be redeemed one time only.
  • Coupon codes may be redeemed for any product (excluding Starter Kits, demonstrator supply items, and Paper Pumpkin month-to-month subscriptions).
  • New prepaid Paper Pumpkin codes may be discounted using Bonus Days coupon codes.
  • Coupon codes will reduce the commissionable amount of an order.

ORDER YOUR‘S TODAY!
Available until August 10th.

Discover messages of friendship and loyalty in the flowers from the August Paper Pumpkin Kit! This kit includes 8 cards, 4 each of 2 designs, and 8 coordinating envelopes.

Tis the season to start your holiday crafting! It’s so simple with this all-inclusive kit. Adhere the die cuts and embellishments, then tie the tag to a gift with a twine bow. You’ll have handmade tags in minutes!

PRODUCTS NEEDED

SUPPLIES TO GATHER

Leave a Reply

Your email address will not be published. Required fields are marked *