The Stamping Muse

Birthday Wishes created with Beauty of the Deep and
Waves of Inspiration

Birthday Card #3 is a fun combination of a number of stamp sets, both new and old. Pulling a variety of stamp sets together to create a card not only extends the life of your stamps and dies while pushing the boundaries of your creativity.

Imperial

Misty Moonlight
     5 1/2″ x 8 1/2″ score @ 4 1/4
     5 1/4″ x 2 1/2″

Basic White-Inside Mat
     2 – 5 1/4″ x 4″
     5 14″ x 2 1/2″
     Scrap

Metric

Misty Moonlight
     1 14.6cm x 20.9cm score @ 10.4cm
     5.7cm x 3.1cm

Basic White- Inside Mat
     2 – 14.2cm x 10.1cm
     14.2cm x 6.3cm
     Scrap

I wanted to use the anchor from the Beauty of the Deep Bundle, so I combined it with the Waves of Inspiration stamp set and Waves Dies. I added the exterior sentiment from the Beautiful Balloon Bundle and the interior sentiment from the Charming Sentiments Bundle.

The color palette includes Misty Moonlight, Coastal Cabana, and Lost Lagoon.

Stamping

  • Stamp 1 anchor on Basic White scrap. in the lower left corner of the inside mat, lower front left corner of envelop, and in the center of the envelop flap with Lost Lagoon ink.
  • Stamp the interior sentiment with Misty Moonlight ink. Stamp the flap of the envelop with an anchor on either side of the Lost Lagoon anchor,
  • Apply Coastal Cabana ink to a clean Sponge Dauber then randomly dabbed the wave image from Waves of Inspiration Stamp Set.
  • Apply Misty Moonlight ink to a clean Sponge Dauber then dab all missed areas and gently blend a few Coastal Cabana edges.
  • Rub Misty Moonlight Card Stock with with the Embossing Buddy. Stamp exterior sentiment in VersaMark ink. Sprinkle with white embossing powder. Brush away any unwanted powder. Heat set until the text is a shiny white.

Die Cut

  • Position the wave die with the squared off upper left corner on the stamped image and secure. Run through the SCEM.
  • Position and secure the Anchor Die from the Beauty of the Deep Dies on the anchor image stamped on Basic White scrap. Run through the SCEM.
  • Insert exterior Basic White mat into the Twisted Rope 3D EF. Run through SCEM.

Build the Card

  • Add liquid glue to the left and bottom edges of the wave die cut. Do NOT add glue to the the curl of the wave at this time. Adhere to Basic White Mat. Trim mat edges if necessary so wave and mat edges are equal.
  • Adhere Basic White mat to card base.
  • Add dimensionals to the back of the sentiment label. Remove backings and tuck label under the curl of the wave allowing right edge of label to ling up with right edge of Basic White mat.
  • Apply liquid glue to the back of the anchor. Tuck the left upper cross bar under the tip of the wave. Then adhere the rest of the anchor so the bottom of anchor is resting on the bottom of wave image.
  • Apply liquid glue to the back of the curl of the wave and adhere.
  • Color 5 Rhinestone Basic Jewels with the Dark Lost Lagoon Stampin’ Blends. Add 2 to the sentiment label, 1 above the sentiment label on the Basic White mat, and 2 in the lower left corner on the Basic White mat.

Build the Inside

  • Adhere interior mat to card base.

Don't forget to decorate the envelope!

The envelope is the where the excitement of receiving
snail mail begins.

I simply decorated this envelop by stamping the image of the anchor onto the envelope flap and in the front lower left corner.

Other ways to decorate an envelope include:

  • Dry emboss the envelope flap.
  • Stamped the envelope flap, front lower left corner, or across the bottom.
  • Adhere DSP along the front left edge and/or across the bottom.
  • Die Cut a label out of DSP large enough to adhere a mailing label of the addressee on it and still see the design of the DSP peaking out around the edges of the mailing label.

MAY'S FREE TUTORIAL

Place a $50 order with me by Wednesday, May 31st and receive this month’s Inspirations In Ink Tutorial focusing on using new In Color Inks with a Stamp Set that is Carrying over. It includes 8 additional projects designed by talented Stampin’ Up! Demonstrators world-wide.

-PLUS-

Receive one of my customer Thank you cards with a PDF so you can create it yourself.

JUNE PAPER PUMPKIN

Don’t miss out on the June 2023 Paper Pumpkin! Available May 11 – June 10.

This month’s kit is all about hospitality! Whether you’re hosting friends in your home or want to stand out as a gracious guest, each card and stamp sentiment can create inviting and welcoming cards that any loved one is sure to appreciate. You and your customers will have so much fun crafting with these cards!This kit includes:

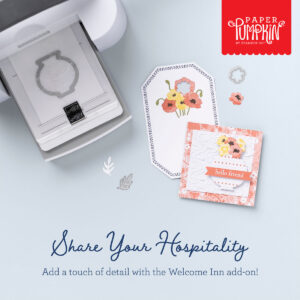
  • All the supplies you’ll need to create 9 elegant and sophisticated cards—3 each of 3 designs—and 9 coordinating envelopes.
  • A coordinating photopolymer stamp set with floral designs and friendly, hospitality-themed sentiments.
  • A Night of Navy Stampin’ Spot and beautiful embellishments
  • Lovely floral details and precut vases

Finished card size: 4-1/4″ x 5-1/2″ (10.8 x 14 cm)

Coordinating Stampin’ Up! colors: Balmy Blue, Boho Blue, Calypso Coral, Daffodil Delight, Early Espresso, Misty Moonlight, Night of Navy, Old Olive

Don’t forget! This kit perfectly coordinates with the Countryside Inn Suite Collection (Item number: 161474).

Welcome Inn Dies are available to die cut the stamped images! (Available for purchase, while supplies last). Item number: 163192 $6.00 USD / $8.25 CAD This add-on includes:
  • One coordinating vase die 1-1/2″ x 1-1/2″ (3.8 x 3.8 cm)
  • One coordinating flower die
  • One beautiful leaf die

PRODUCTS NEEDED

SUPPLIES TO GATHER

Leave a Reply

Your email address will not be published. Required fields are marked *