Daffodil Dies (Single Daffodil) Ornate Frames Dies (Label) Painted Texture 3D EF
Cardstock
Flirty Flamingo (Card base 4 ¼”w x 11”h, score at 5 ½”) Basic White (Interior Mat 4w x 5 ¼”h; Scrap for single daffodil, label) Vellum (Exterior Mat 4”w x 5 ¼”h)
DPS
Ombre Specialty Paper (3 ¾”w x 5”h)
Ink
Granny Apple Green (All Stamping, Label Edging)
Blends
Granny Apple Green (Leaves light, Stem dark) Flirty Flamingo (Center of Doily, Flower)
Embellishments
White ¾” Frayed Ribbon (4”) Heart & Home Doilies (1) Opal Rounds (8)
Envelope
Basic White, Medium (Decorate your envelope! The joy of receiving snail mail begins with the envelope.)
Other Supplies
Stampin’ Up! Paper Trimmer Stamp Cut and Emboss Machine (SCEM) Clear Acrylic Blocks B & E Take Your Pick Tool Bone Folder Scissors Grid/Scrap paper Stampin’ Pierce Mat Silicone Craft Sheet Simply Shammy Adhesives (Tombow Liquid Glue, Stampin’ Seal, Stampin Seal+, Tear & Tape, Dimensionals, Glue Dots)
Directions
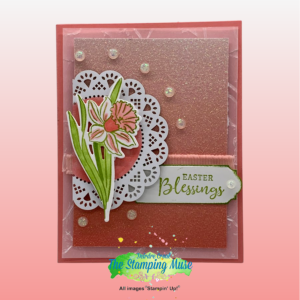
This card is built vertically. (Use photo above for reference any time you have questions about dies used or placement of stamping or die cuts.)
1. Cut card base and mats as listed in the Materials & Measurements Section.
2. Use Granny Apple Green ink and stamp the single daffodil and exterior sentiment on Basic White scrap.
3. Color the single daffodil Flower with Flirty Flamingo and the leaves and stem in Granny Apple Green Stampin’ Blends. Using the Flirty Flamingo Stampin’ Blend color the white side, center of the doily and the White Frayed Ribbon.
4. Frame and secure the single daffodil with the Daffodil Die and frame the exterior sentiment with the Ornate Frame Die shown in photo. Run through SCEM.
5. Insert Vellum mat into Painted Texture 3D embossing folder and run through SCEM.
6. Dip the edges of the label on the Granny Apple Green ink pad. Repeat until entire label edge is green.
7. Adhere the ribbon to the Ombre Specialty Paper one quarter of the way up from bottom of mat.
8. Place dimensionals on the center of the doily then adhere to the left edge of the Ombre Specialty Paper with part of it hanging off the edge. Cut the doily even with the edge of the Ombre Specialty mat and adhere to the Vellum mat. Secure the double mat to Flirty Flamingo card base.
9. Place dimensionals on the daffodil die cut and center on doily. Tuck the sentiment label under the doily allowing the top half of the ribbon to show.
10. Embellish with 8 Opal Rounds.
11. Stamp sentiment on interior mat. Adhere strip of Ombre Specialty Paper to the left edge of the interior mat. Adhere mat to inside of card.
Don’t forget to decorate the envelope! The joy of receiving snail mail begins with the envelope.
Stamp a daffodil in the lower left corner of the envelop. If you want to color the image insert a piece of scratch paper inside the envelop, so the Stampin’ Blends don’t bleed through.